
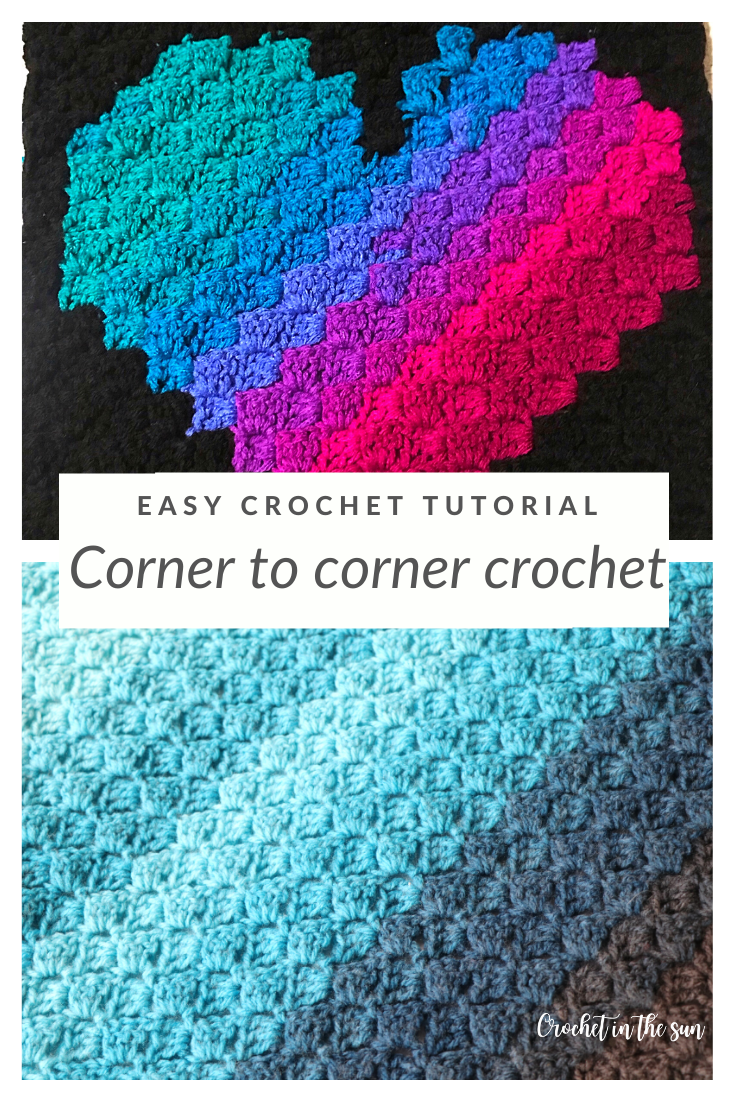
Let’s learn how to corner to corner crochet! This provides a clear, step-by-step photo tutorial for the c2c stitch (corner to corner stitch). This stitch is easy to learn and is beginner friendly.
What is corner to corner crochet (C2C)?
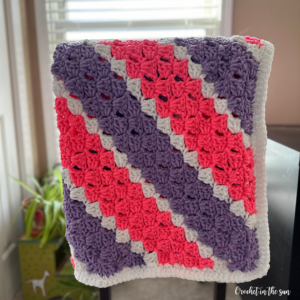
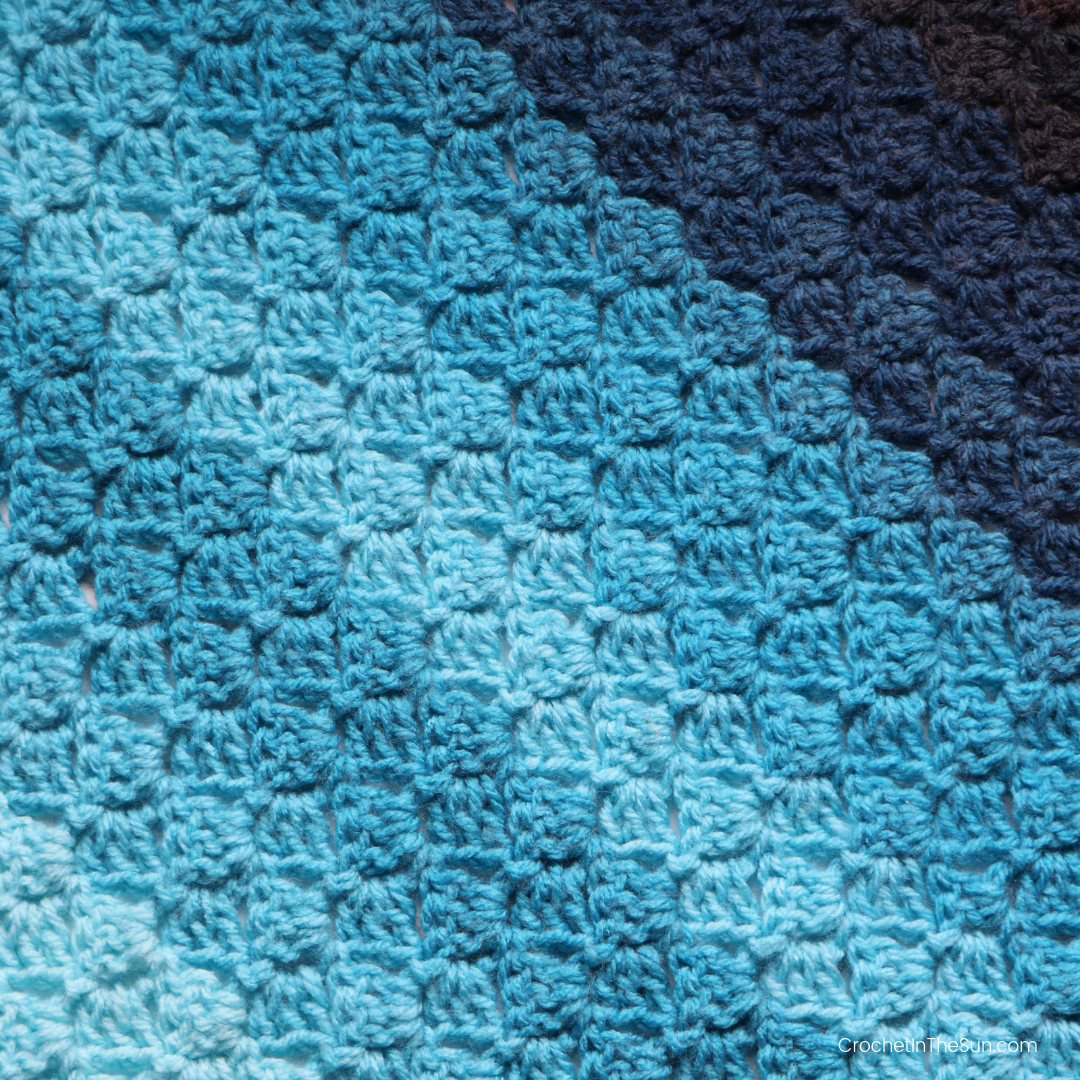
With corner to corner crochet, you start your project in 1 corner and work blocks (or tiles) in a diagonal fashion, ending in the opposite corner.
Learning corner to corner crochet
When I first started crocheting, I had never heard of C2C. I remember I was searching for Disney crochet patterns (as I always do) and found a blanket with the Mickey Mouse ears pattern. That was what led me to realize you can make a picture or detailed design using C2C. I was so excited!
But soon after the excitement came a huge amount of confusion as to how the heck I actually work the stitches. At one point, I thought this was simply one aspect of crochet I wouldn’t tackle.
But I promise it’s not nearly as tricky as it seems! Once you learn the technique, you’re set – off and running with endless design possibilities.
Ready to try C2C yet? Let’s go!
Need some supplies? Check out my Amazon storefront, which has a consolidated list of my favorite yarns, crochet hooks, and other crochet accessories you’ll need to complete your projects! These are the actual products I personally use and highly recommend.
As an Amazon Influencer, I may earn from qualifying purchases.
Stitches (US terms)
- chain (ch)
- double crochet (dc)
- slip stitch (sl st)
If needed, refer to my Beginner’s Guide to crochet. Those stitch tutorials will walk you through how to complete these stitches. If you need to convert from US to UK terms, have a look at this chart.
Abbreviations
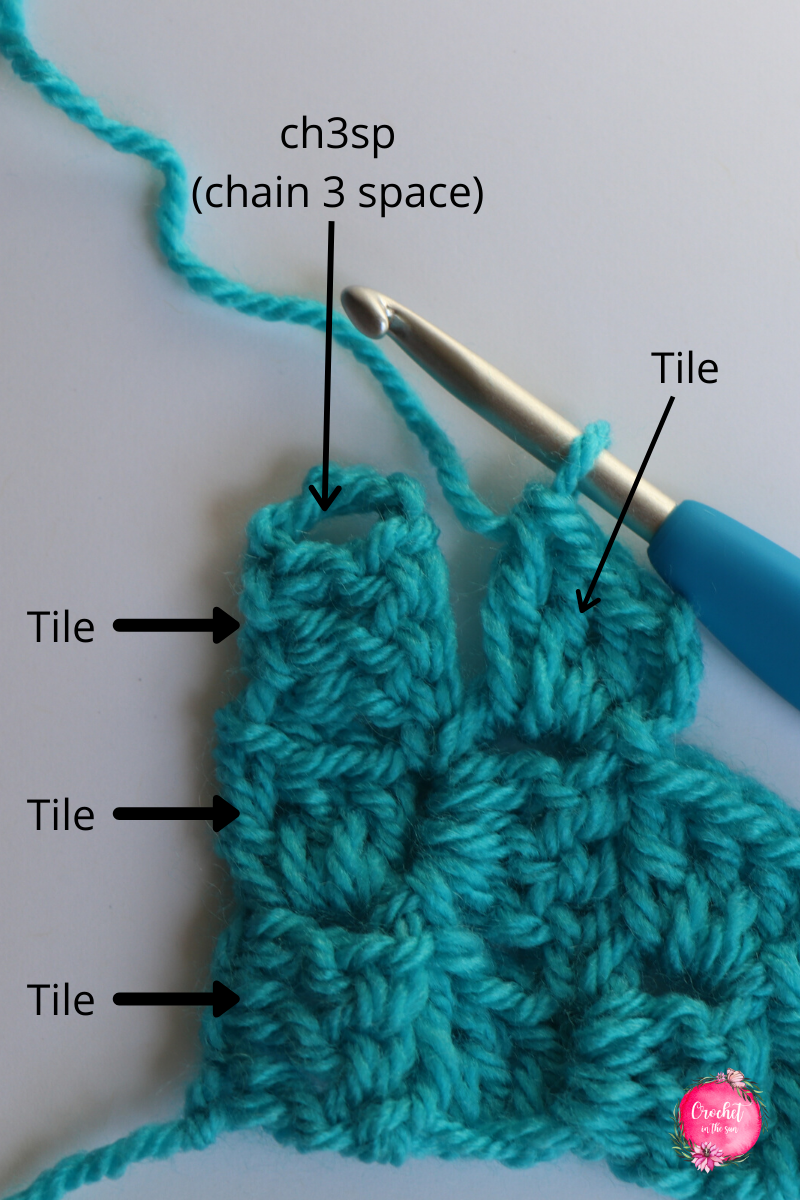
- A “tile” or block is a set of <ch3+3dc>
- ch3sp: In this pattern, the ch3sp (or chain 3 space) refers to the space between the ch3 and 1st dc of the tile you’re working into.
Pattern notes:
- The yarn tail from your initial slip knot is like an “anchor” for you in this project. It should always be on the bottom right when you’re working on the “right side” of the project”.
- Once you get to row 2, it’s a simple repeat over and over. However, you will notice I list rows 3 and 4 as well though. Why? They’re all basically the same, but its worded slightly differently and I start to abbreviate more / explain less as I approach row 4, just to simplify the wording. Row 4 is the instructions to follow for a normal (increase) row.
- At the end of each row, you turn your work.
The below C2C tutorial was made using Paintbox Simply Aran yarn with a 5mm crochet hook.
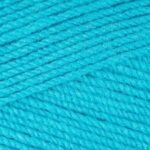
You can pick up Paintbox Yarn at Lovecrafts:

Corner to corner crochet instructions
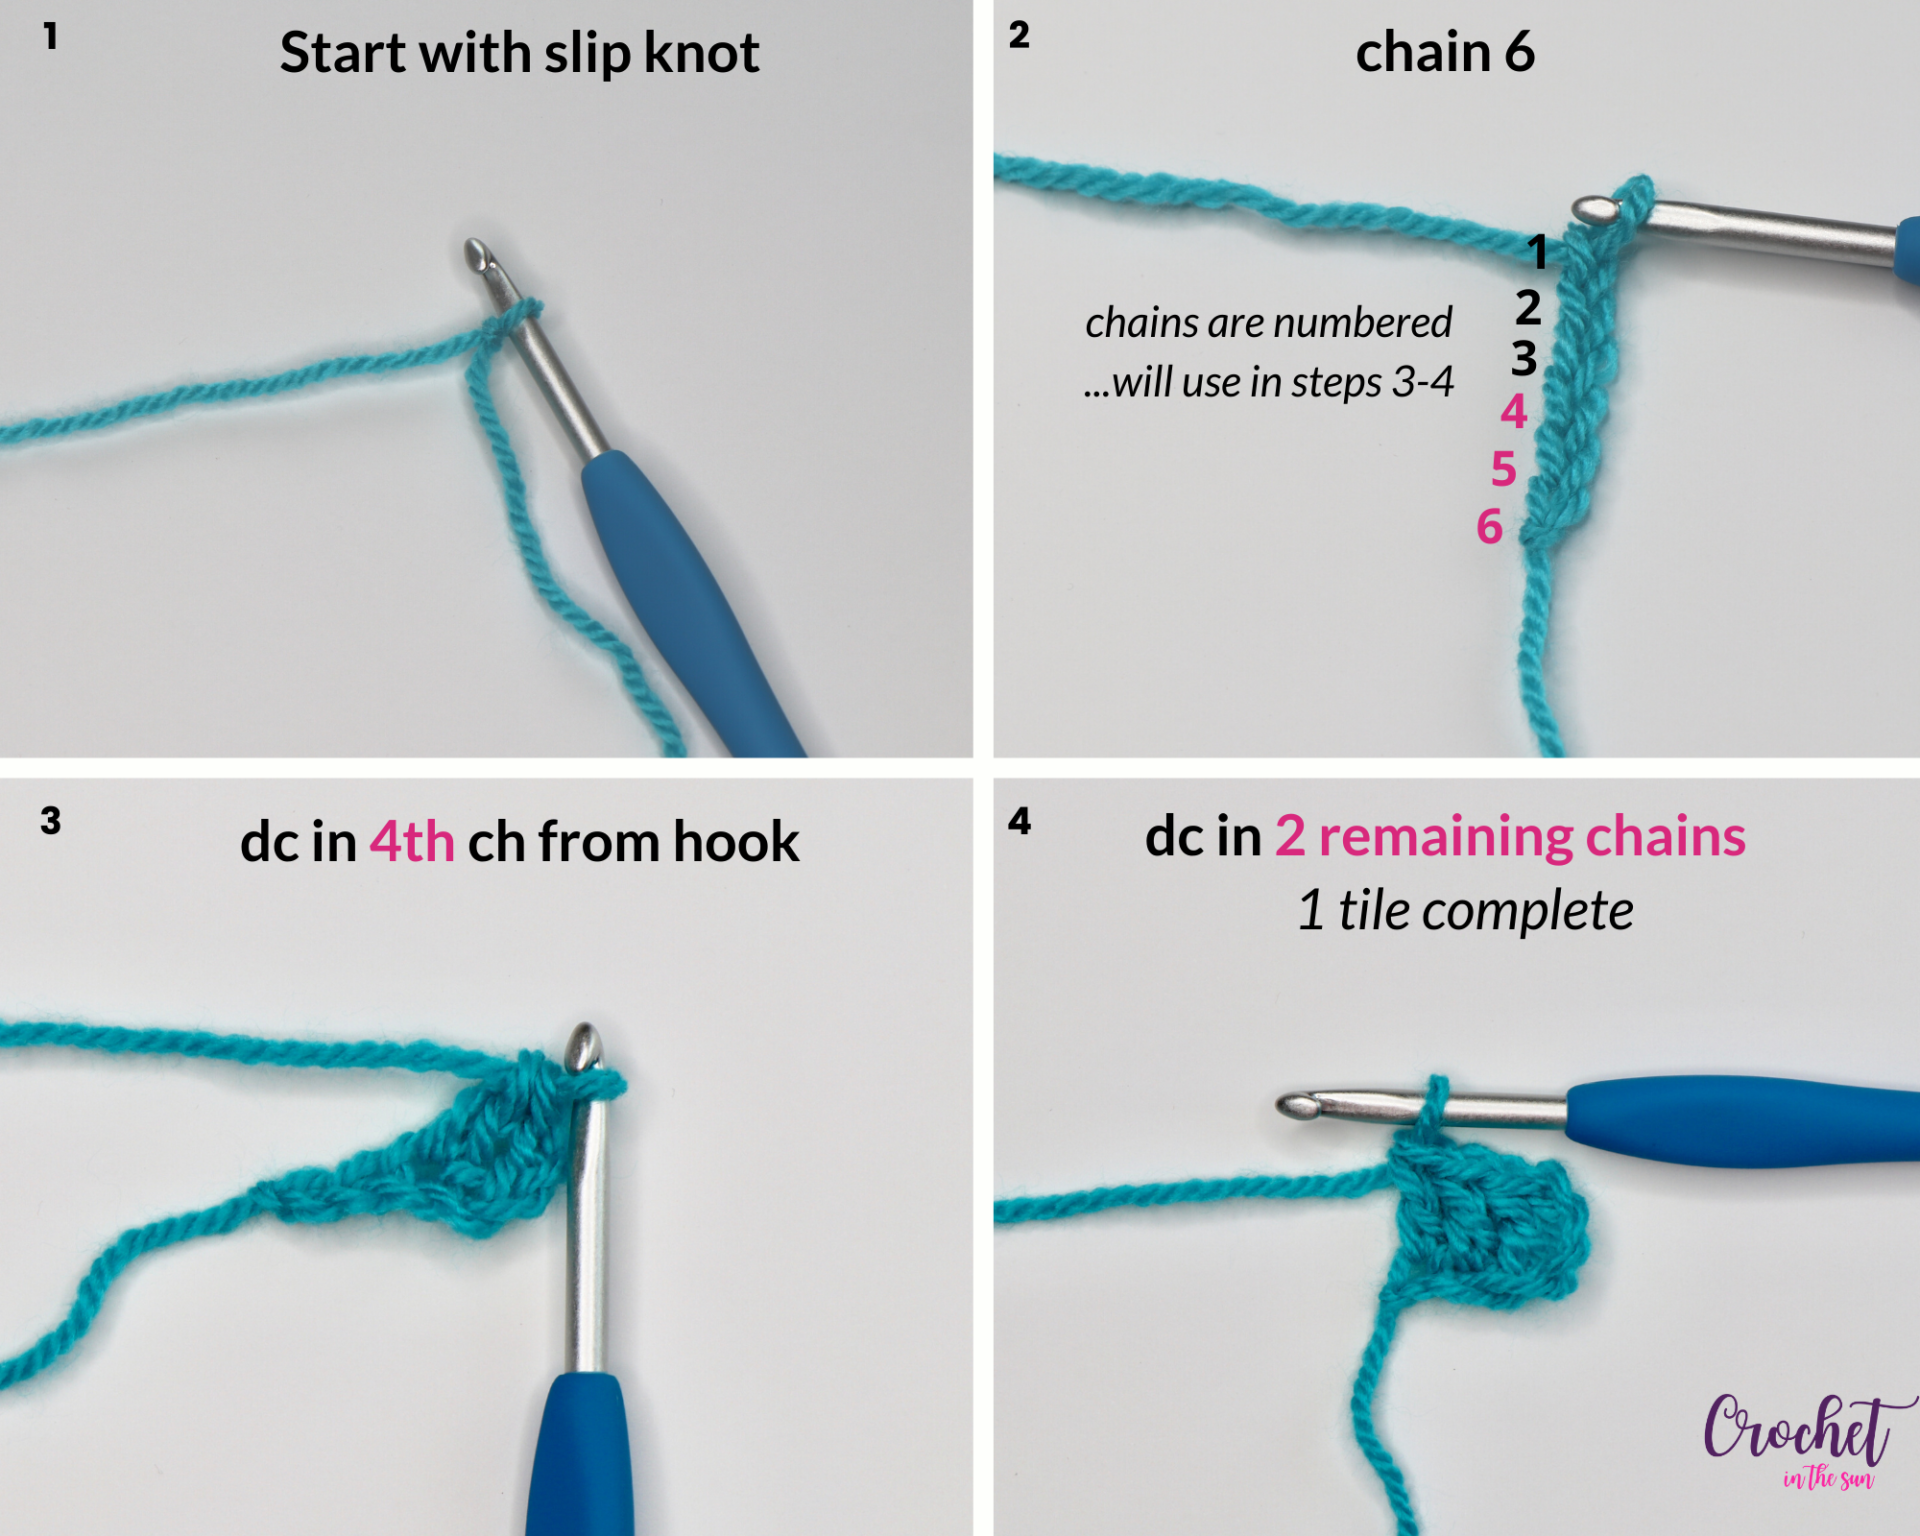
Row 1
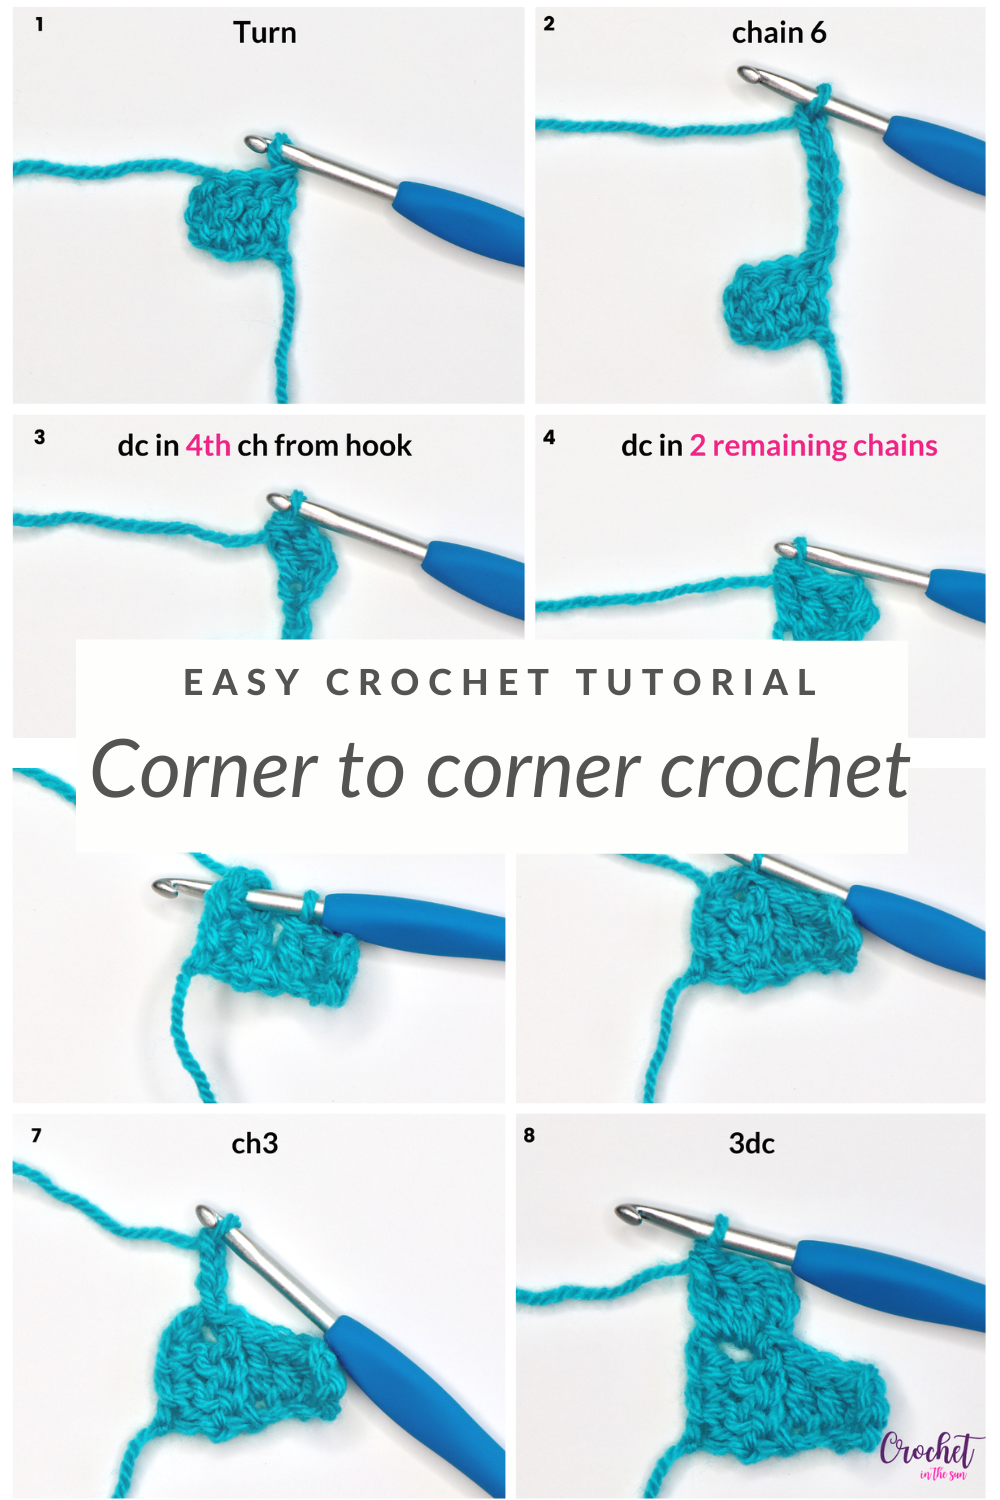
- To start: chain 6
- Dc in the 4th chain from the hook. Dc in the remaining 2 chains [1 tile complete]
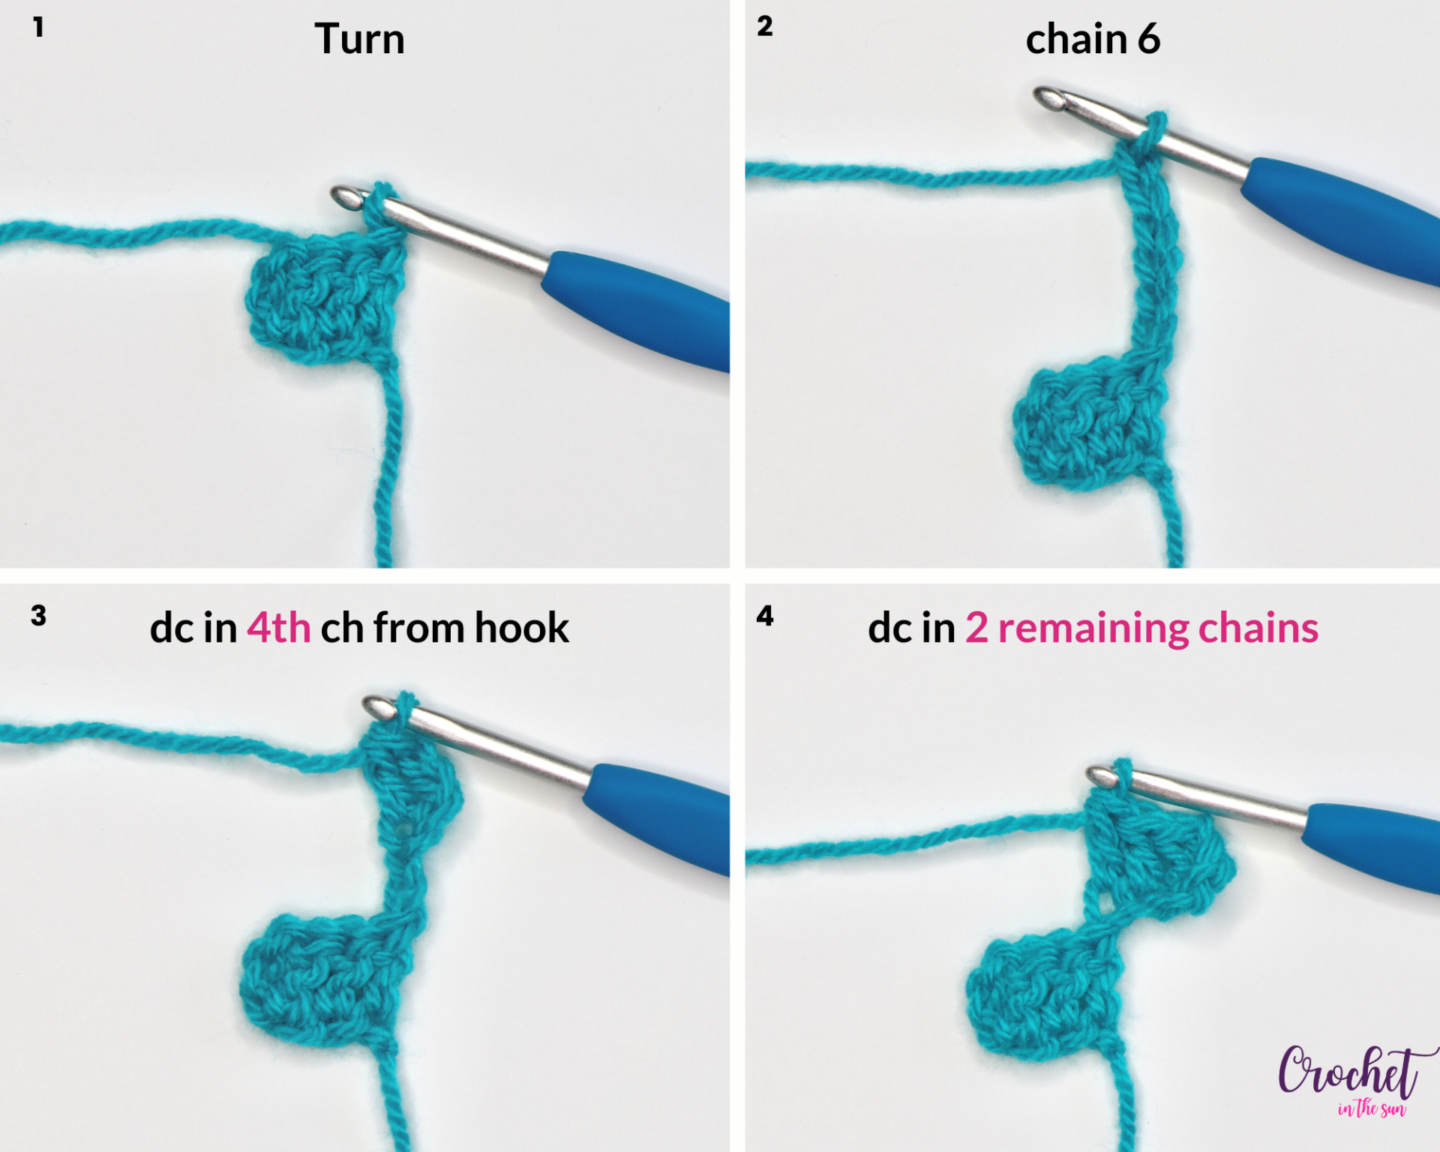
Row 2
- Turn your work, chain 6. Dc in the 4th chain from the hook and in the next 2 chains.
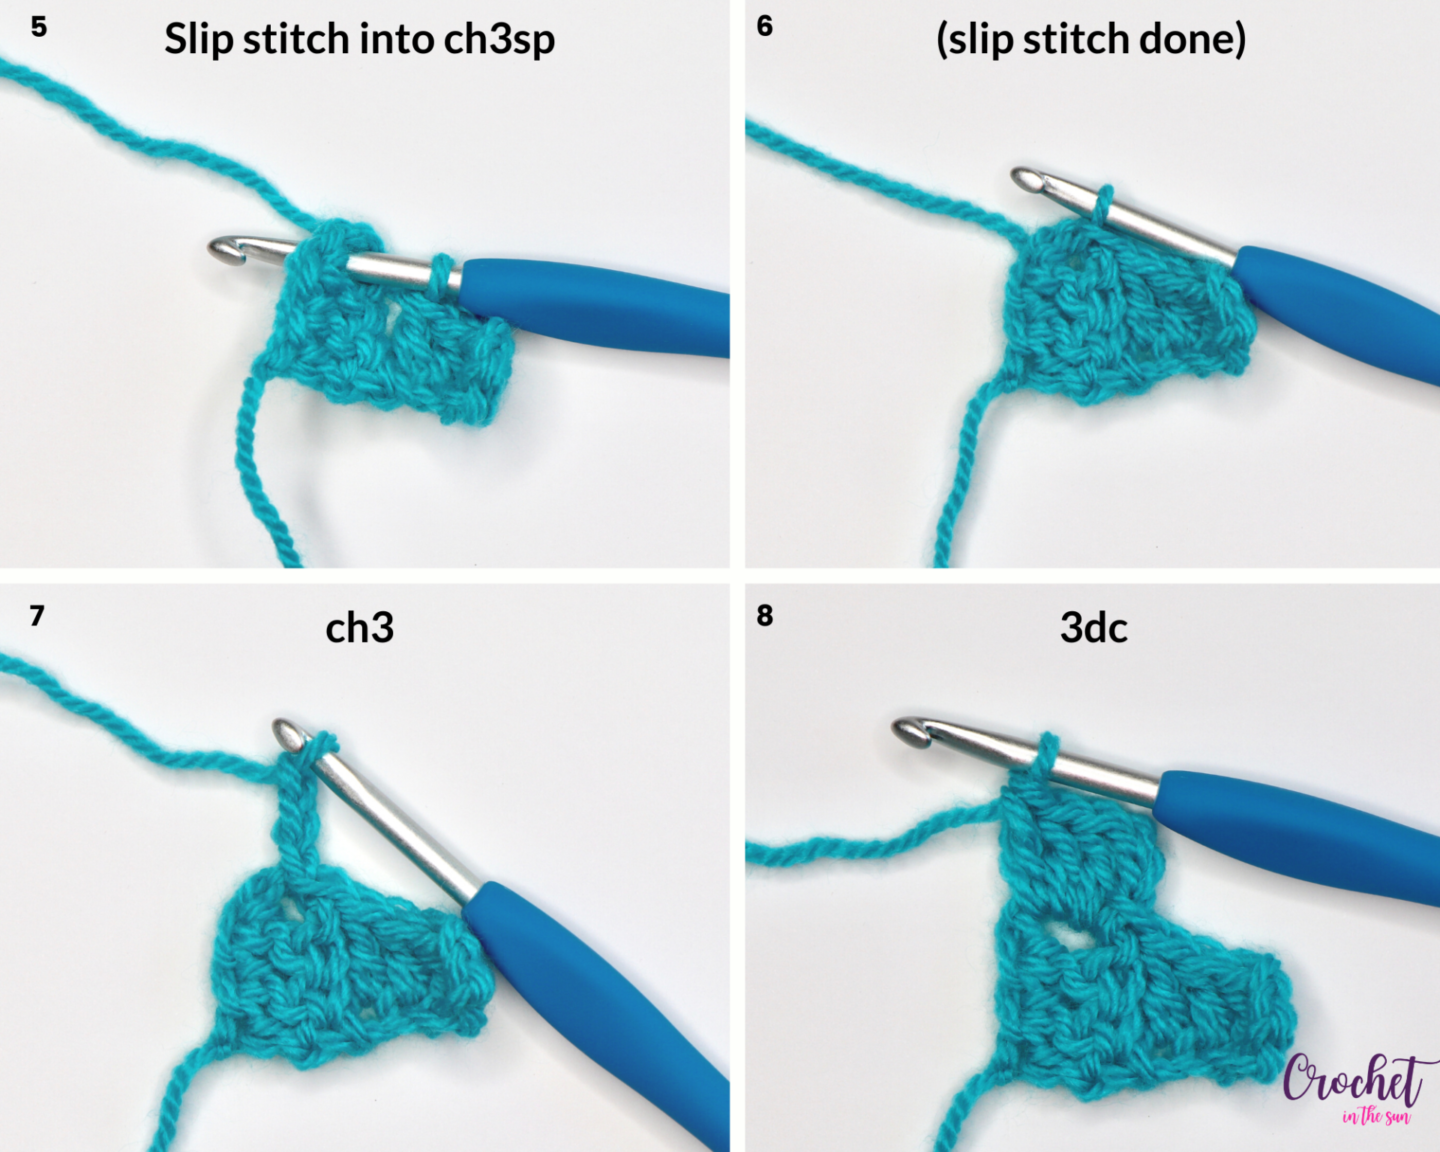
- At this time, (if you haven’t already done so) flip your first tile down, so the yarn tail is on the bottom right. Locate the space between the ch3 and dc from the first tile. We’ll refer to that space as the ‘chain 3 space’ or ‘ch3sp’. To join the 2 tiles, slip stitch into the ch3sp.
- Chain 3 and work 3 dc’s into that same ch3sp. [Row 2 complete]
Row 3
- Turn, ch6, dc into 4th ch from hook and in next 2 ch. Lay this tile to the right, so you can slip stitch properly in the next step (see photo below for reference)
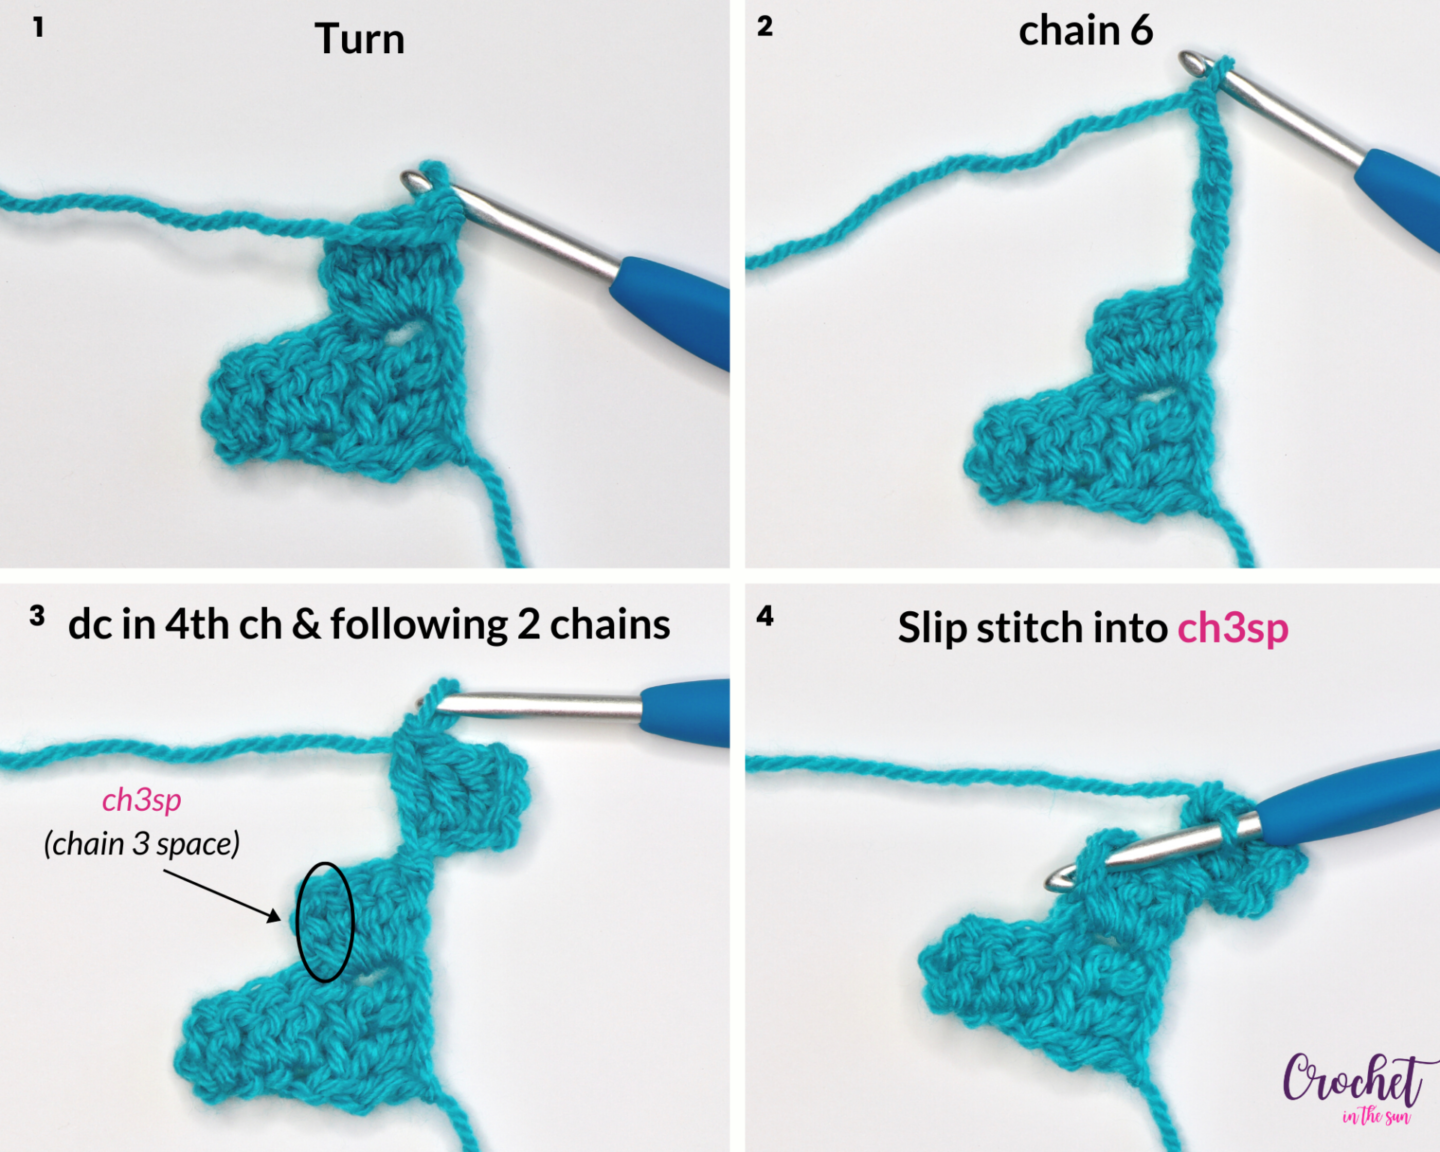
- *Slip stitch to join to previous row. (Same as above, you will slip stitch into ch3sp). Ch3 and work 3dc in ch3sp.* Repeat from * to create the last tile of the row. [Row 3 complete]

Row 4 and after will follow the instructions for generic C2C increase, which means you’re continuing to make your project both taller and wider.
Therefore, as long as you are comfortable with the abbreviations, refer to the Row 4 as the row you repeat over and over until you need to decrease.
Row 4 – Generic corner to corner increase directions
- Step 1: Turn, ch6, dc into 4th ch from hook and in next 2 ch.
- Step 2: Slip stitch into ch3sp. <Ch3, 3dc> into ch3sp. [1 tile complete]
- Step 3: Repeat step 2 until you complete all the tiles in the row.
Corner to corner decrease direction
Eventually, you will want to start decreasing…else your project will continue growing and never meet back up at the other corner 🙂
You can start to decrease on both sides at the same time if you want, but you certainly don’t have to. Basically, if you start to decrease at the same time on both sides, your finished project will be a square, because it will have the same number of tiles on both parallel sides.
On the other hand, if you decrease on 1 side and continue to work (for example) 10 more rows before you decrease on the other side, your finished project will be a rectangle, where one side will be 10 tiles longer than the other.
To start, instead of <ch6, dc in 4th ch and next 2 ch>, you will NOT do this step. That ‘chain 6’ step is how you “increase” the height of the project.
As you will see, the only difference between increasing and decreasing is Step 1 – either you increase the height or keep it at the same height.
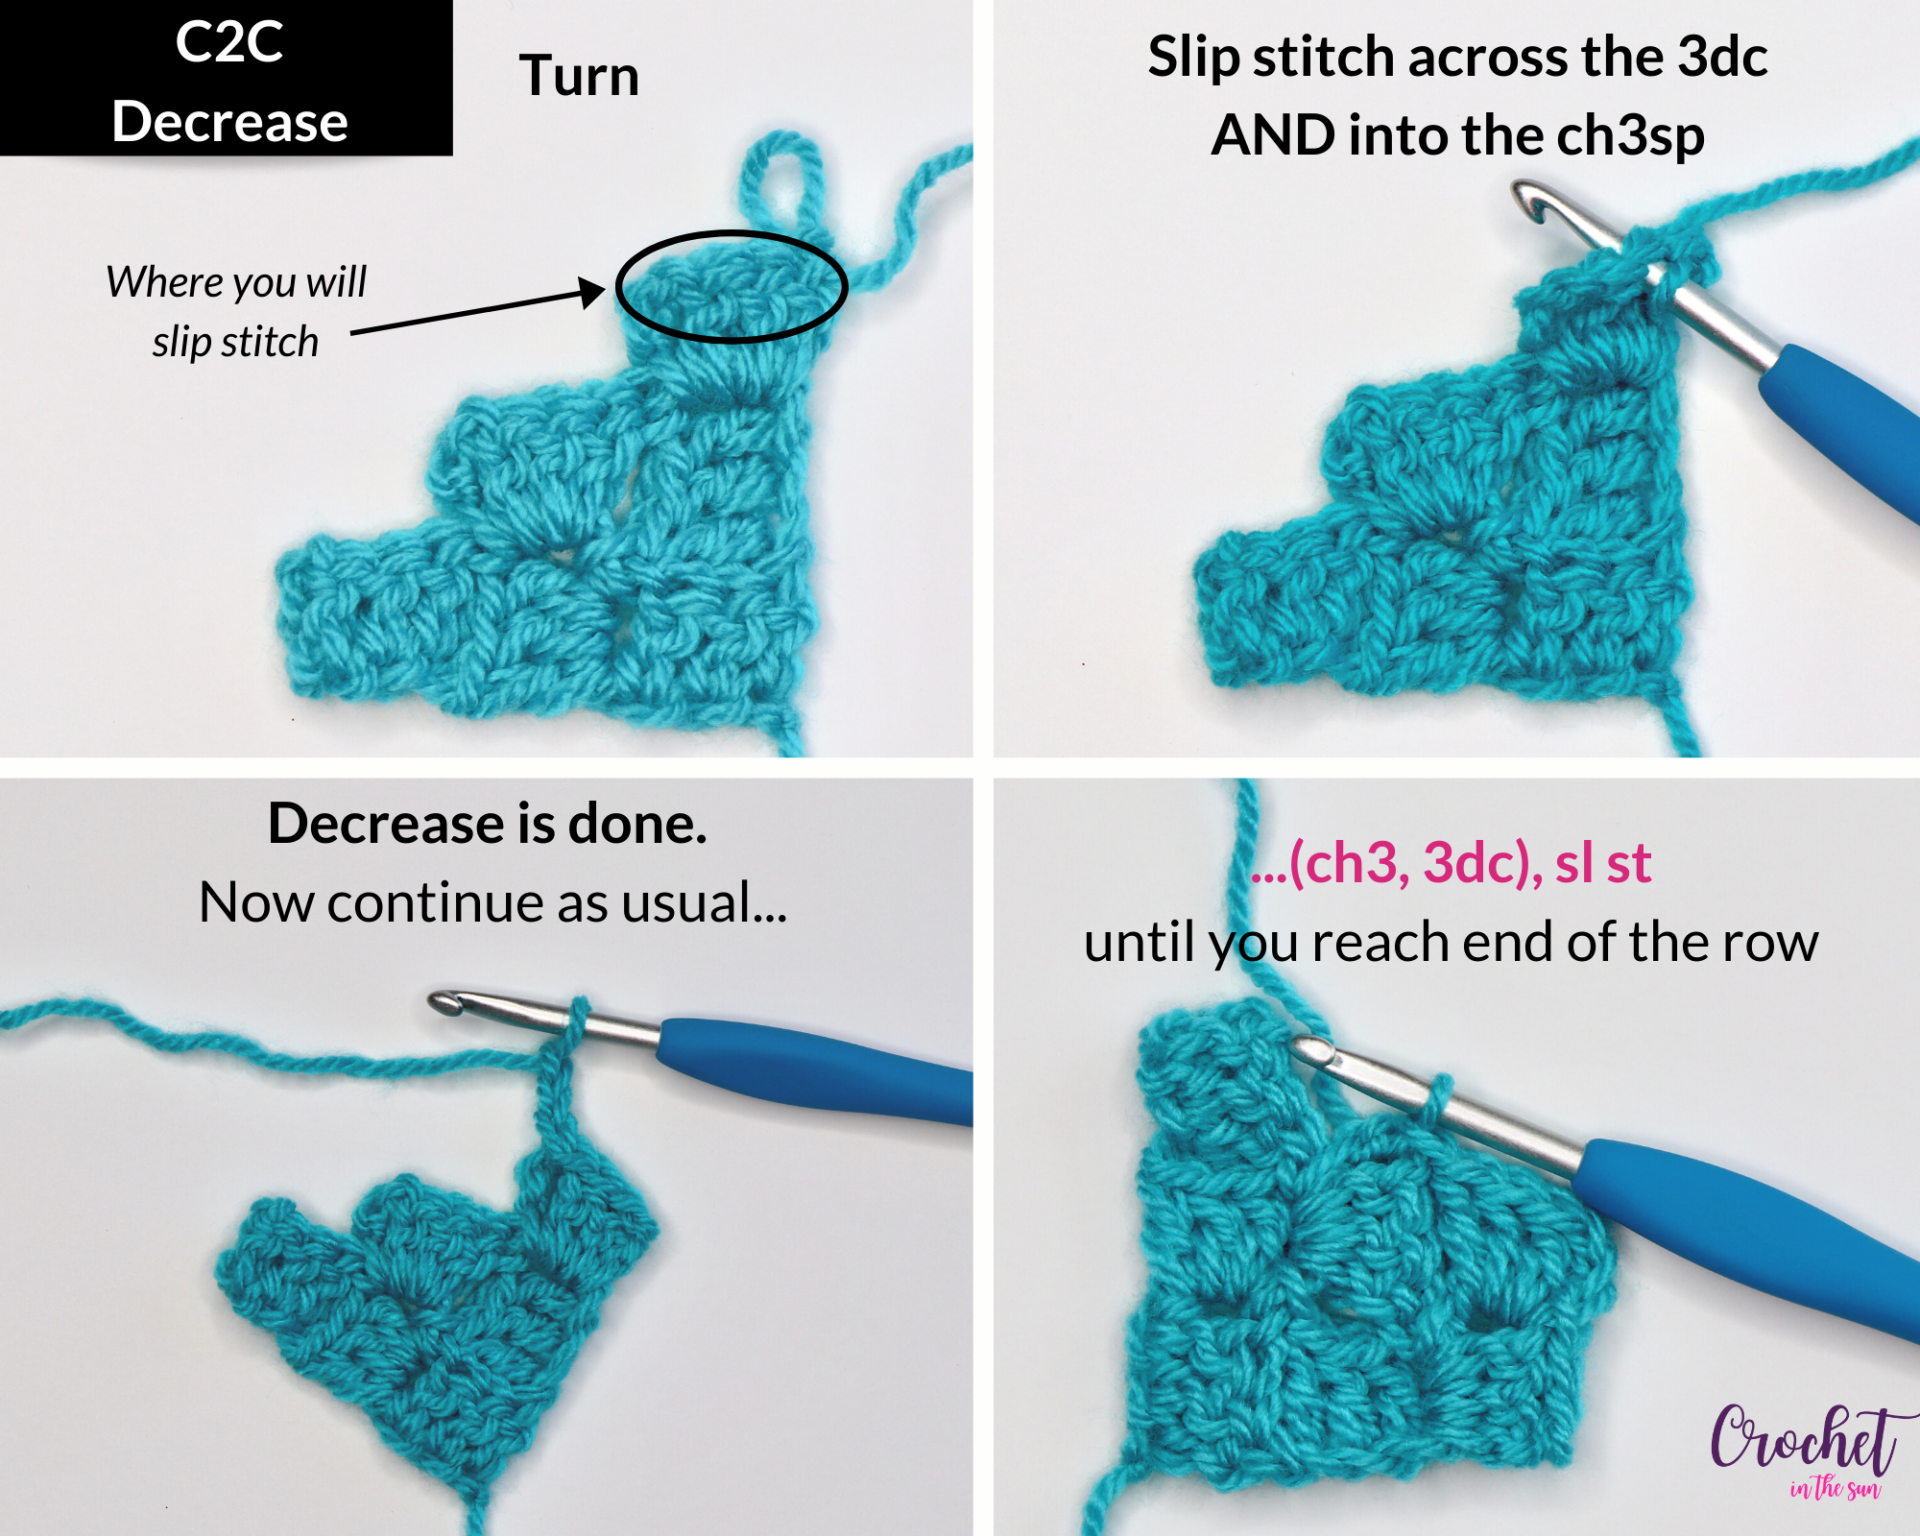
To decrease:
- Turn, slip stitch into the 3 dc’s and into the ch3sp. This lets you work across the tile without adding any height. You have officially started decreasing this side of your project.
- <Ch3, 3dc> into ch3sp
- *Slip stitch into ch3sp. <Ch3, 3dc> into ch3sp.*
- Repeat from * until you complete all the tiles in the row.
There ya go! You now know C2C crochet, which has opened up the door for MANY fun projects 🙂
Here are some extra tips to help you along your way.
Tips on changing colors in crochet
HOW to change colors in crochet?
In general, you change colors in crochet by completing the last part of the previous stitch with the new yarn.
When I say the last part of the stitch, thats the last ‘yarn over, pull through’ sequence.
WHERE to change colors?
First, keep in mind that you can change colors either in the middle of a row or at the very end/beginning of a row in corner to corner.
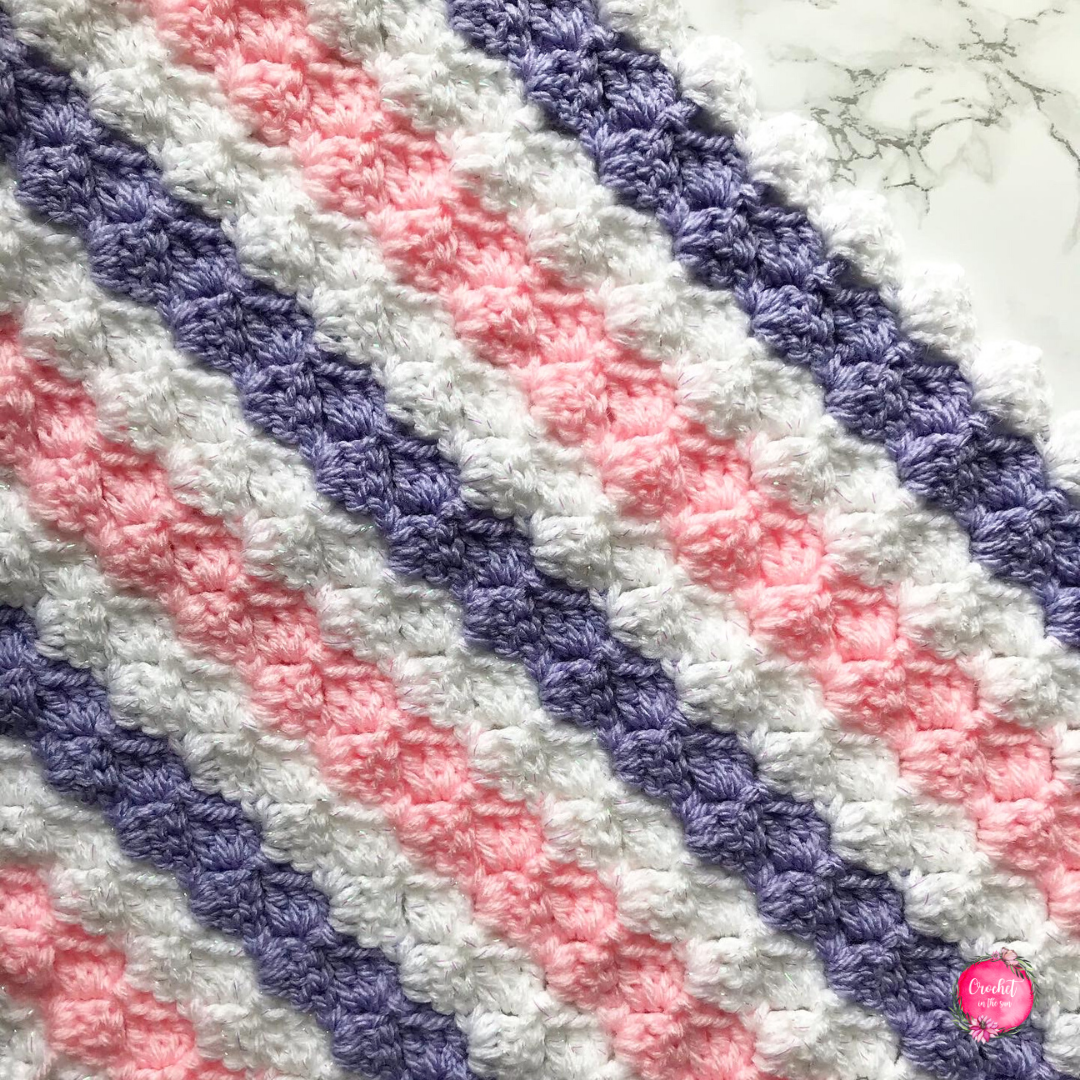
For example, if you’re working a striped pattern, you would only change colors at the very end of the row, so the entire next row is worked in the new color.
On the other hand, some patterns might call for you to change colors in the middle of the row.
IN WHAT STITCH do I change colors?
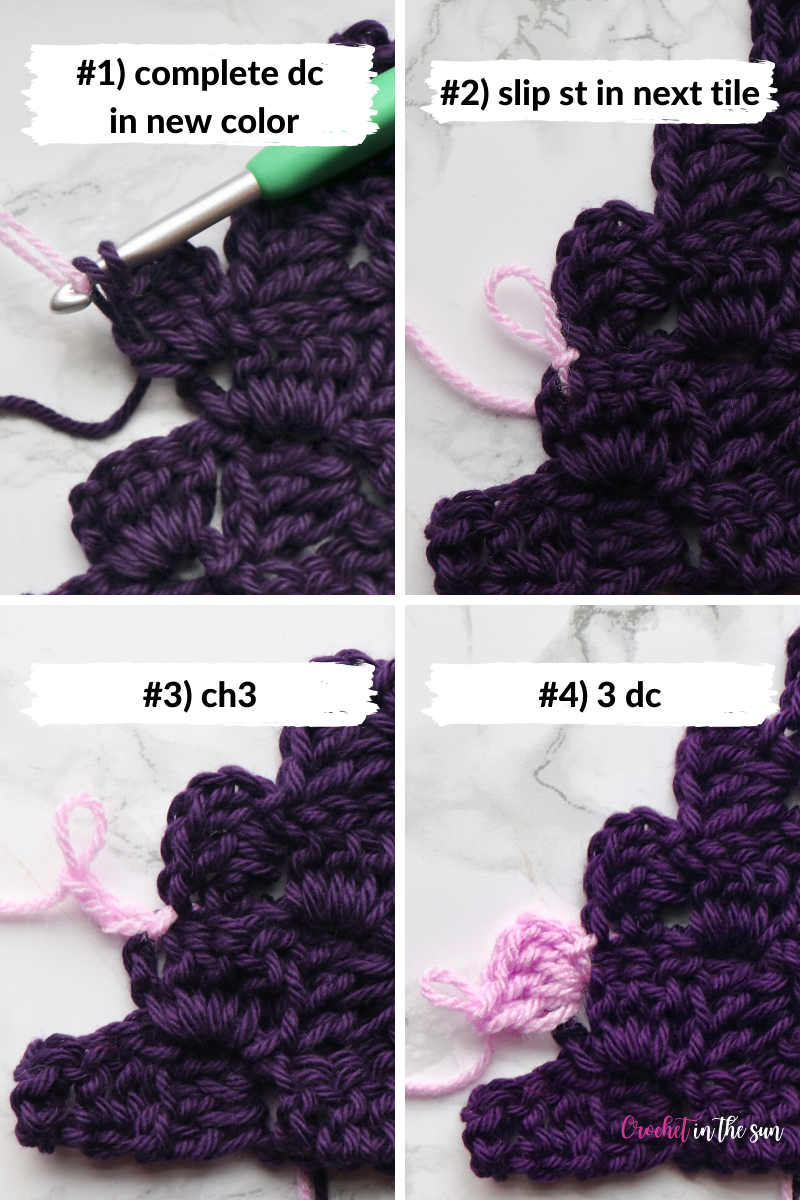
If you’re changing colors in the middle of a row:
In the tile before you want to change colors, complete the last stitch of the dc in your new color. Then continue as you would, with the new color (sl st, ch 3, 3dc, repeat). See below.
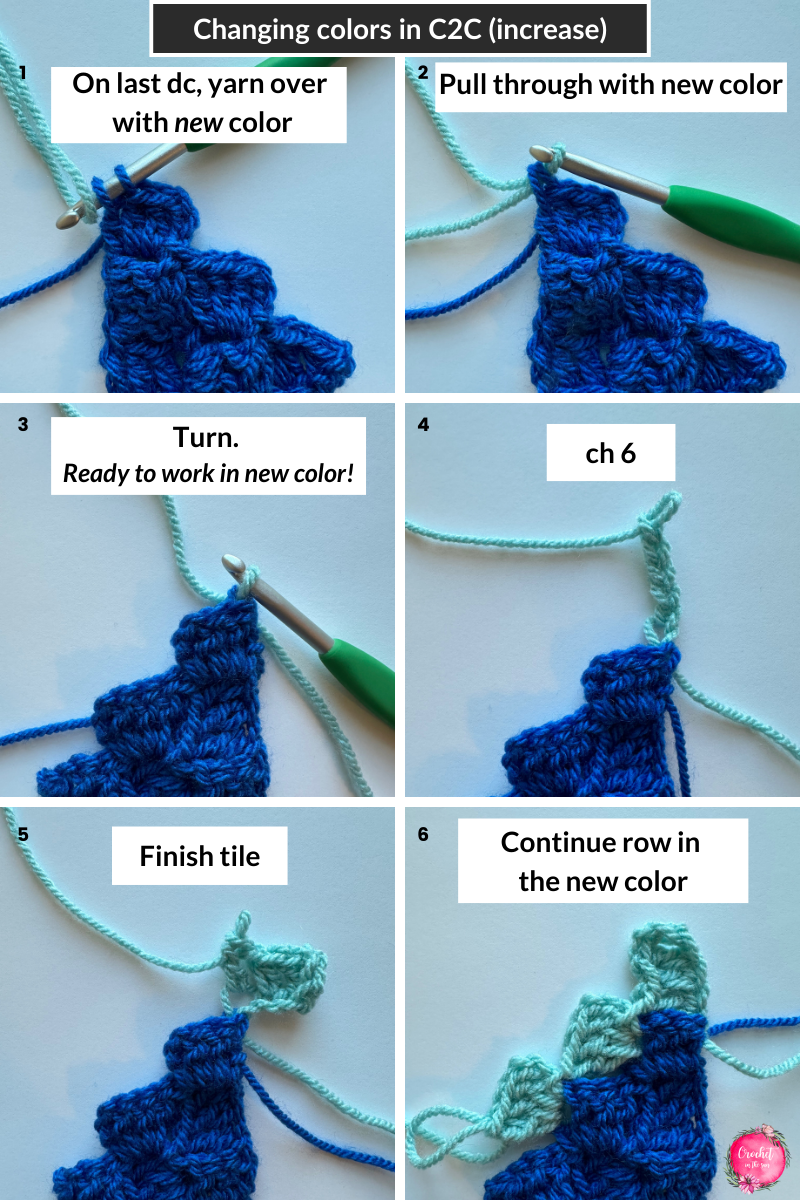
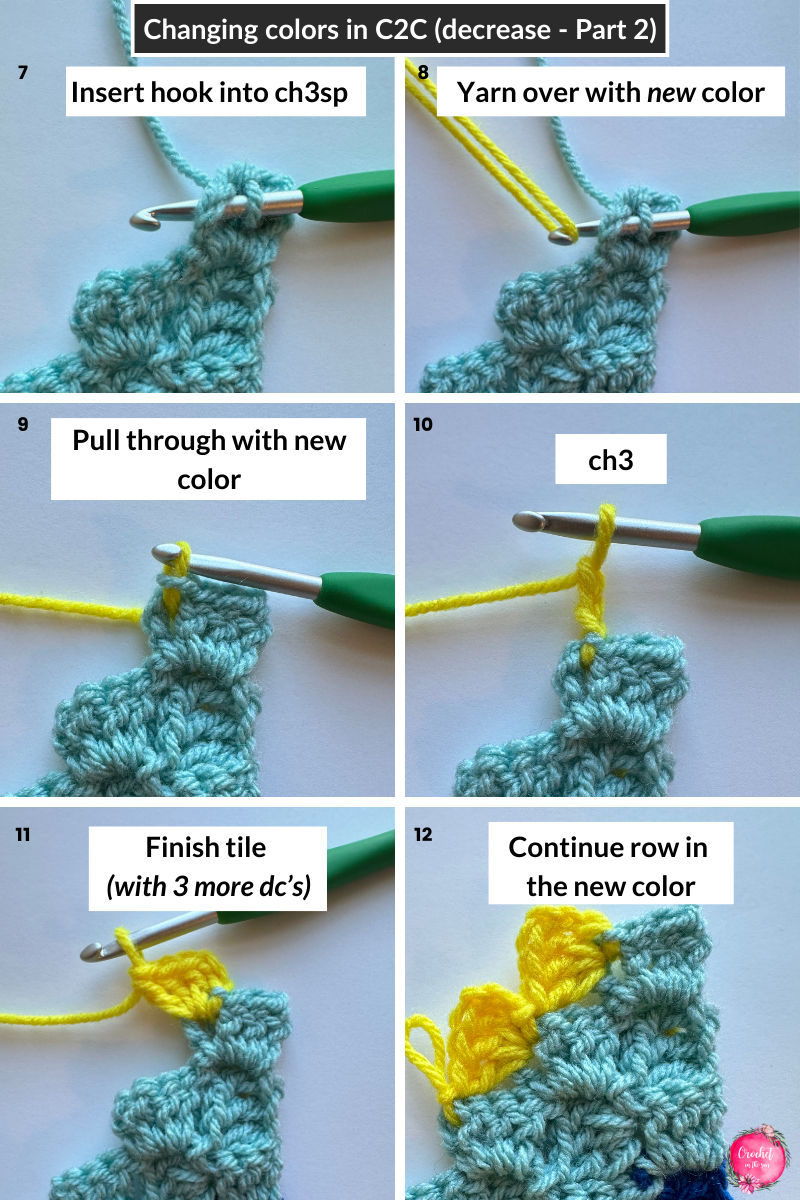
If you’re changing colors at the end of the row:
- When increasing: Change colors in the last yarn over of the last dc in the row. Turn, ch6, and continue the new tile in your new color. Continue the row with your new color.
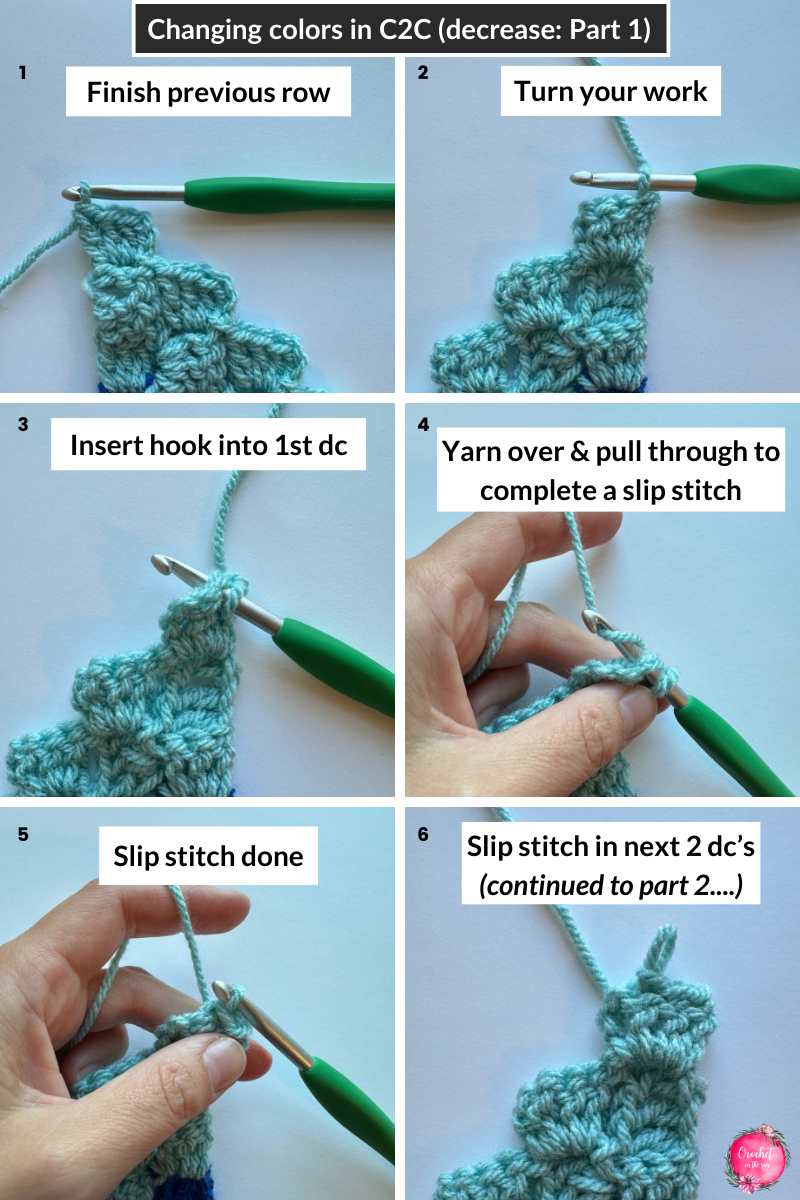
- When decreasing: Once you’ve finished your row, turn, slip stitch into 3 dc’s using current color, slip stitch into the ch3sp but complete the yarn over with the new color. Ch3 + 3dc to create the new tile in your new color tile. Continue the row with your new color.
Carrying the yarn
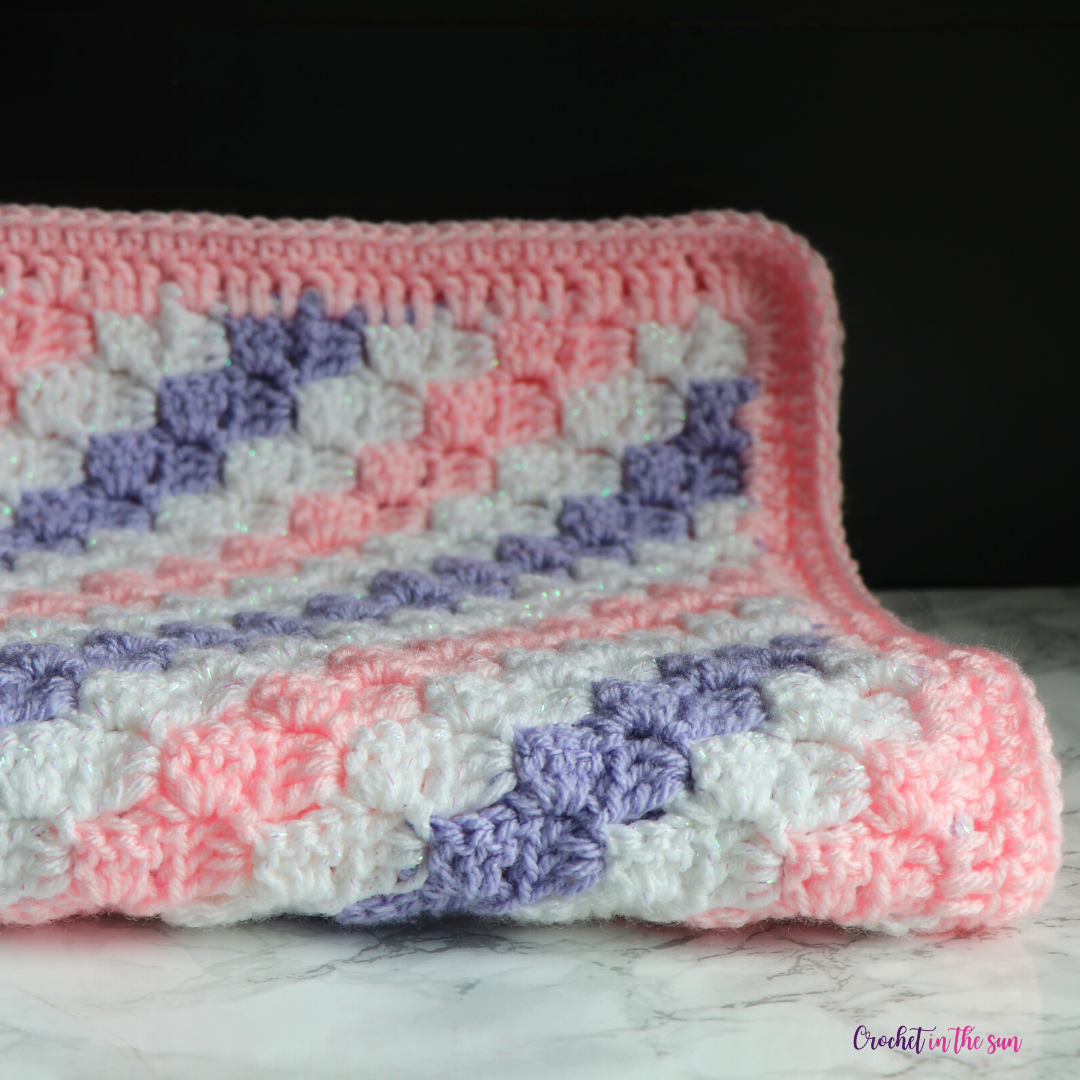
Some projects really lend themselves to carrying the yarn, rather than fastening off/cutting your yarn after each color change. This may be true for ‘striped’ patterns because you can carry the yarn up the side and work over it as you add your border.
Have a peak at the c2c Spring Blanket to see how the yarn was carried and worked over.
You can also try carrying the yarn forward or carrying backward within a row. If you want to try that, leave enough slack so the project doesn’t pucker, but also don’t leave an excessive amount of yarn to work over.
Fastening off vs. carrying yarn during color changes
Some considerations to help you determine whether you prefer to fasten off or carry your yarn:
Option 1: If you fasten off: You will have many ends to weave in, however this does provide for a cleaner look as you can easily weave in the yarn end into the same color tile, so you can’t see the yarn peeking through.
To follow this method, you will always attach a new color each at the end/beginning of the row. The finished product won’t look any different, you will just have more ends to weave in – that’s all!
Option 2: If you carry yarn: You will work over the carried yarn when working your border. One downside is that you may be able to see the yarn peeking through just a bit. If you prefer a 100% clean look, you may prefer option #1. On the other hand, with this method you have a lot less ends to weave in!
If you do carry your yarn, make sure you’re not pulling the carried yarn too tight, else it may cause the blanket to pucker in a bit.
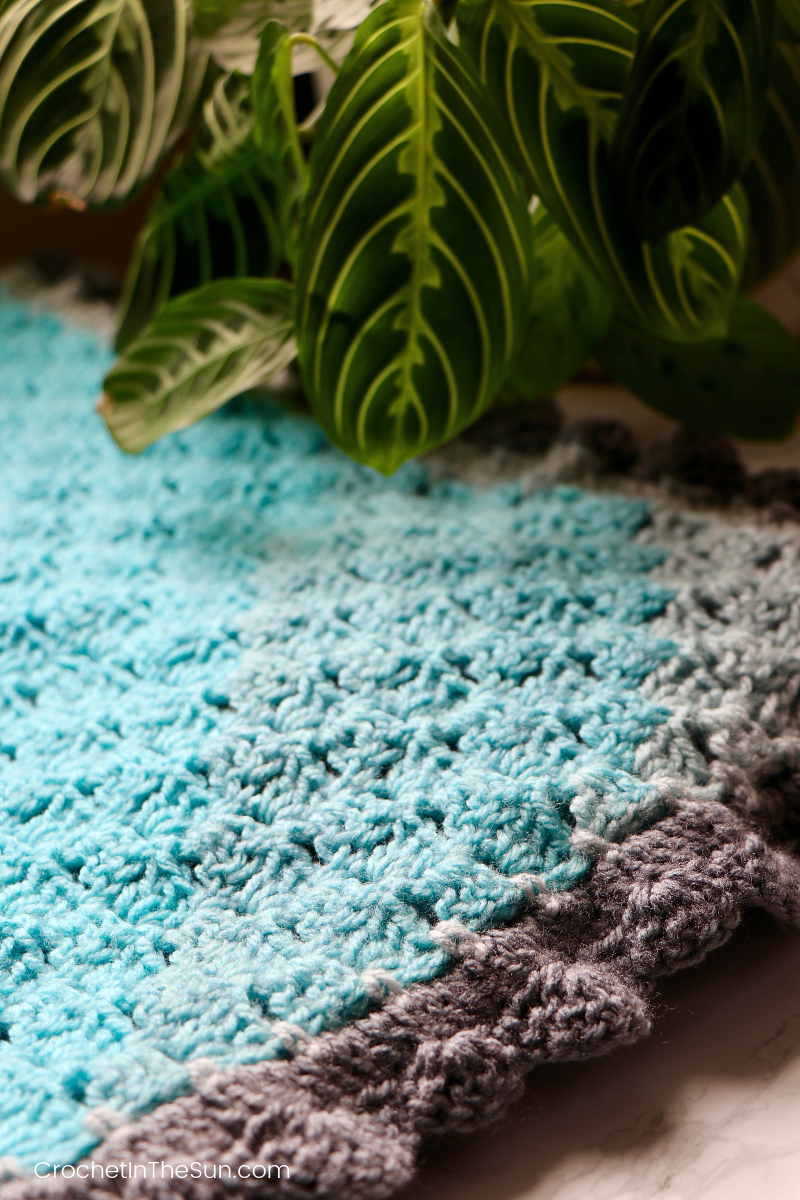
Simply keep the carried yarn as part of the project and work your stitches over it. Not only does the border provide a neat finish, but it also covers up the yarn you carried along the side since you’re literally stitching over that yarn. Your border is functional and pretty! 🙂
Bobbins
Bobbins can be useful here for many color changes within a row. Here’s some info on using bobbins.
I have personally never used bobbins, but may come in handy when you’re working on a complex C2C pattern when various color changes within the rows.
Here are some C2C projects to try:
Sugar Plum Snuggles C2C blanket
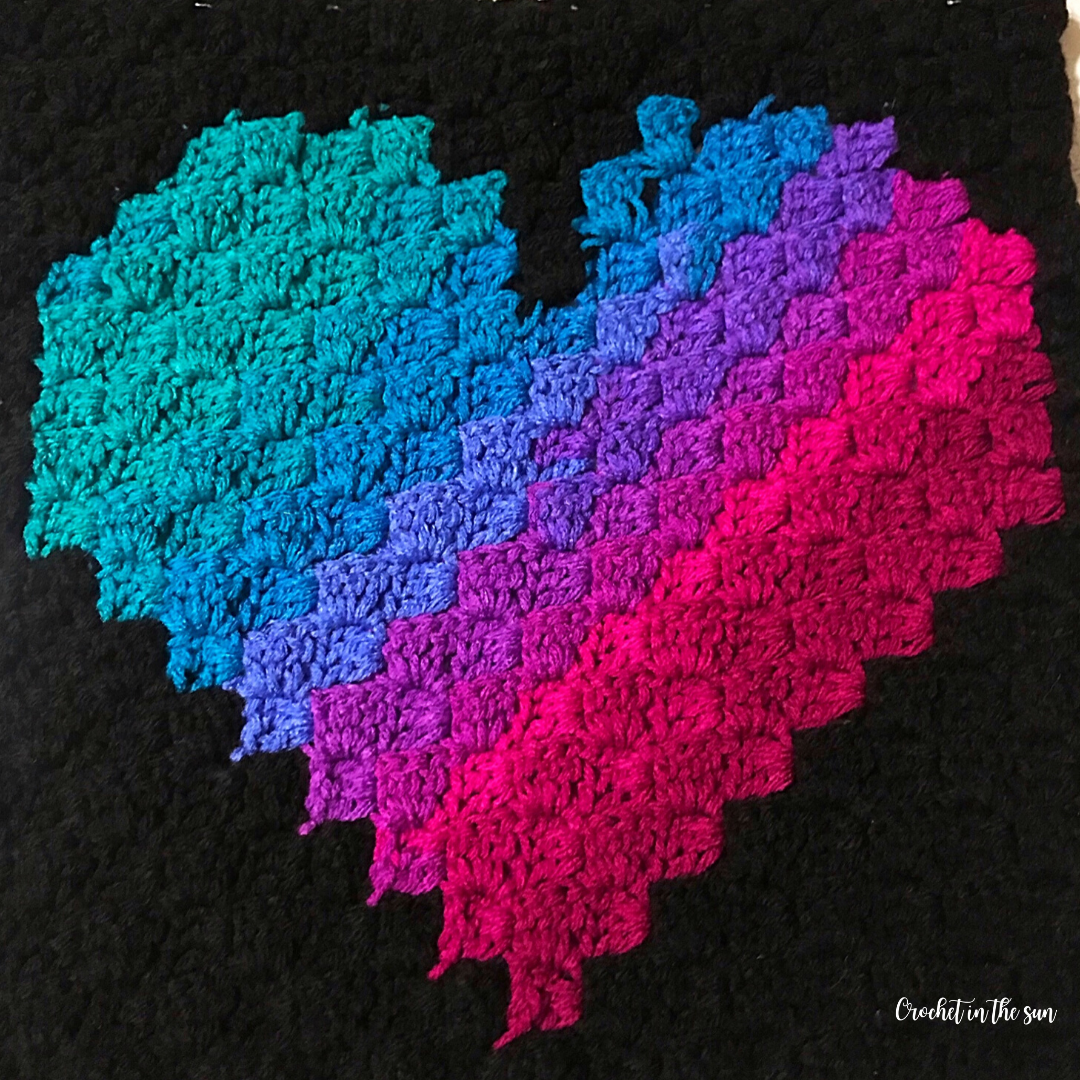
Corner to corner Heart Wall Hanging Crochet
Why should I try C2C?
Corner to corner crochet continues to be an all-time favorite crochet method for many, myself included. It’s a fun and popular stitch for so many reasons.
Here are 5 reasons why you should try C2C.
1. It’s easy to remember
You can get somewhat lost in the soothing the repetitive motion of the C2C stitches. Once you learn how to complete your first two rows, you’re smooth sailing!
It’s a mindless stitch (in a good way), meaning you can c2c and carry on a conversation or watch TV – it doesn’t require counting or an extreme amount of focus. Yay for crochet multitasking!
I think of this as the Blanket of 3’s pattern. Why? Because if you count out loud as you stitch, you might find yourself repeating, “1, 2, 3, 1, 2, 3…”.
Chain (1-2-3), (1dc, 2dc, 3dc), slip stitch, chain (1-2-3), (1dc, 2dc, 3dc), repeat.
2. So many possibilities
Cheesy, yes. But it’s true! C2C is so versatile. Once you learn it, you can make blankets, wall-hanging decor, pillow covers, dish towels, coasters, and many other types of projects.
Learning c2c will bring plenty of crochet projects in the future, trust me 🙂
3. Creative freedom – don’t need to plan it out
Do you like to let your creativity guide your work, or make changes on the fly? C2C allows you to do just that.
The size of the project is determined by when you start to ‘decrease’. The design will keep getting bigger in both width and height until you start to decrease on 1 and eventually both sides.
This is pretty cool because you don’t necessarily need to have the exact dimensions planned out ahead of time, you can make these decisions as you go! (However, if you’re following a set pattern or graph, then follow the pattern as stated.)
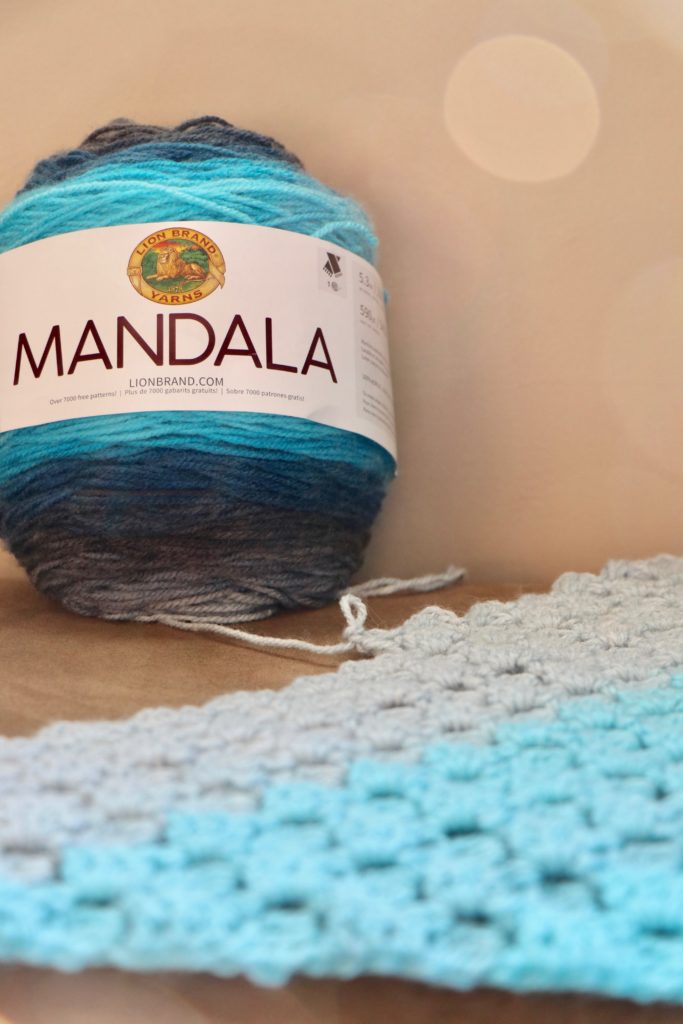
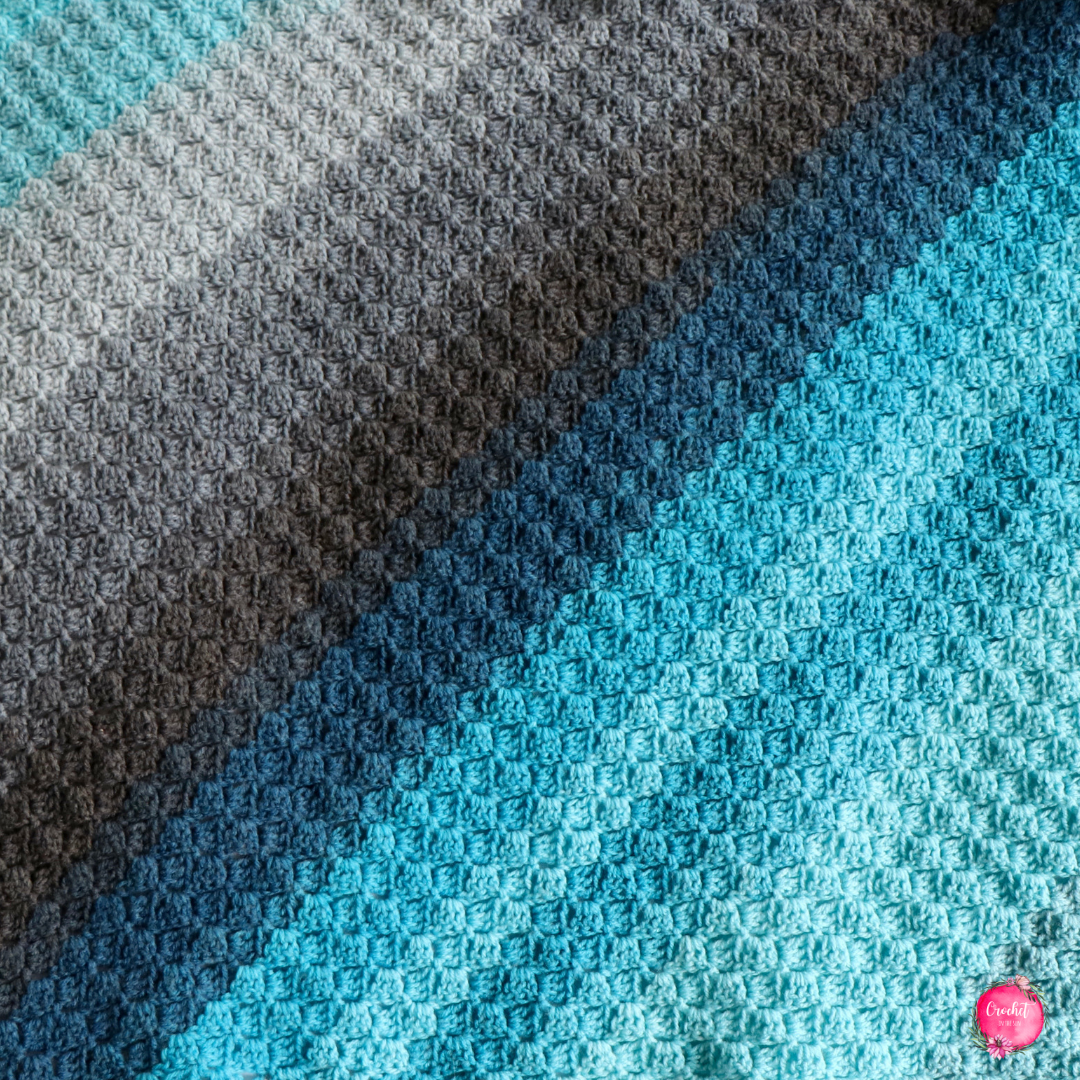
So for example, depending on how quickly the color changes are coming (if you use self-striping yarn), or honestly how long you want to work on the project, you can decide when to start wrapping up the project. When you’re ready, start to decrease.
Once you start decreasing on both sides, the project gets smaller and smaller, which is also great for us mentally because time flies by at the end!

4. Graphgans
Corner to corner crochet is very unique since it allows you to create “pictures”. Think anything from a heart, to a tiger, to an abstract design.
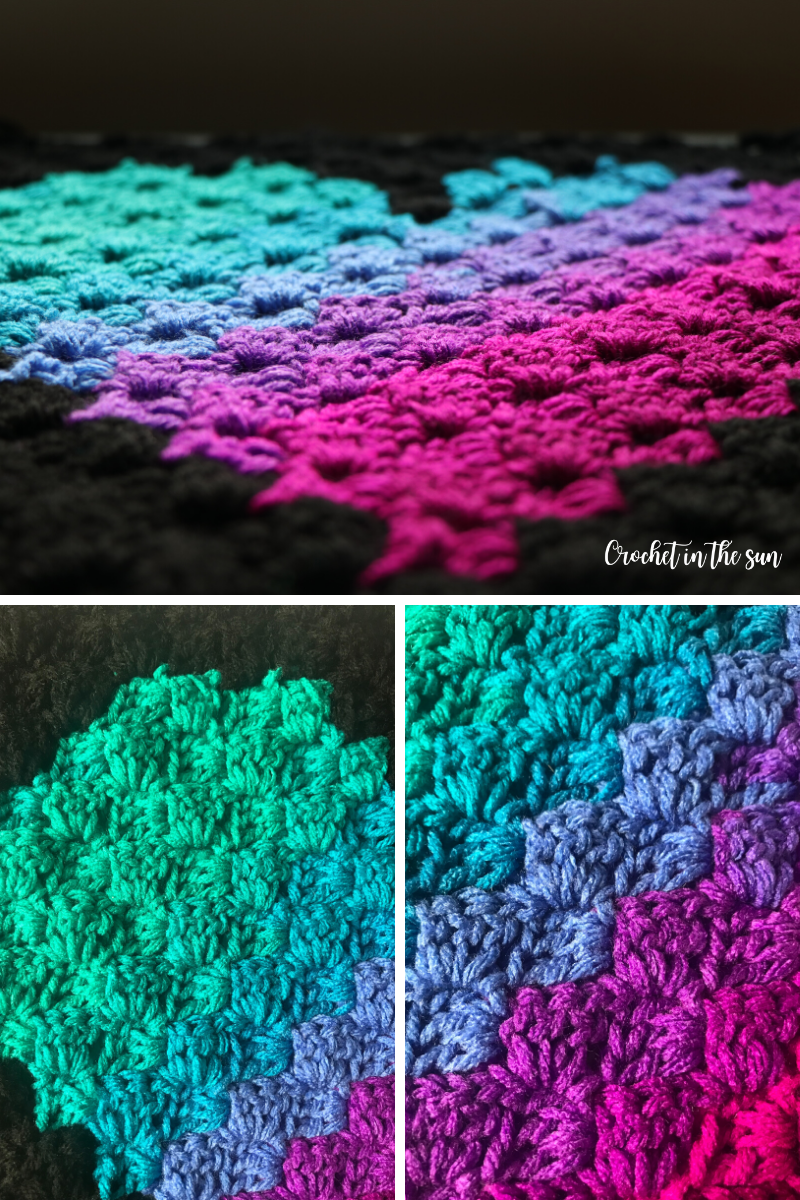
That’s called a graphgan. It’s an afghan made using a graph of different colors, which form the picture or design. (These possibilities are what drew me to C2C in the first place!).
5. Beauty
And lastly, it’s just truly a beautiful stitch 🙂
Thanks for following along! I hope you found this tutorial helpful. If you know anyone who’s looking to learn crochet, feel free to share this post along with the Ultimate Beginner’s Guide to Crochet.
Useful crochet references
- Crochet hook size conversion chart
- Yarn weight conversion chart
- Ultimate Beginner’s Guide to Crochet

Happy crocheting,
Jennifer
Pin for later


I am loving this c2c I always thought it was complicated blows me away how easy and beautiful thank you so much 😁
So easy and fast thank you for the instructions
I think it’s a very good pattern.. I love the way it comes together. So many possibilities! Tutorial was dead on easy to follow! Thank you so much ❤️
Do you have instructions for the “maintained rows”.
What does it mean when you are working on the wrong side and you have to start decreasing on the right side of that same row?
Thank you so much. You have helped me understand this so much. I honestly have hope at being able to creat beautiful pieces for my grandchildren and family
What does it mean when you are working on the wrong side and you have to start decreasing on the right side of that same row?
Any tips for someone who crochets left-handed? I’m struggling to “flip” it all backwards to make it work for me.