
* Heads up: During June 2020, this tutorial is getting a major overhaul, so please excuse any photo tutorials or other items that don’t look fully updated! Thanks, Jen
Welcome! So you want to learn how to crochet!? Awesome, you’re in the right place.
This ultimate beginner’s guide will cover the below topics, with many photo tutorials along the way.
Overview:
- Learn the basics: How to hold your hook, how to hold your yarn, abbreviations (US terms), and step by step photo tutorials for chain, single crochet, half double crochet, double crochet, and slip stitch
- Work a swatch: How to start each row (e.g. how to chain up) and work a swatch to get familiar with the stitches
- Crochet tips: Various tips to keep in mind to help make this adventure a successful one!
- Find crochet inspiration: How to use Pinterest for crochet inspiration
- Decide on your first pattern: Choosing the best yarn and pattern for your first project
I am so excited for you, because I know all the fun that lies ahead! Let’s get started.
- Get the inexpensive, ad-free printable PDF from my Etsy Shop
- Pin this tutorial to your Pinterest Boards
1. Learn the basics
How to hold the crochet hook
There are two ways to hold a crochet hook: like a knife or like a pencil.
Try both techniques and use whatever feels most natural to you. Don’t be discouraged if you see others with a different grip. Both grips allow you to crochet the same stitches, it’s just a personal preference.
Looking for crochet hook recommendations? Have a look at Clover and Boye.


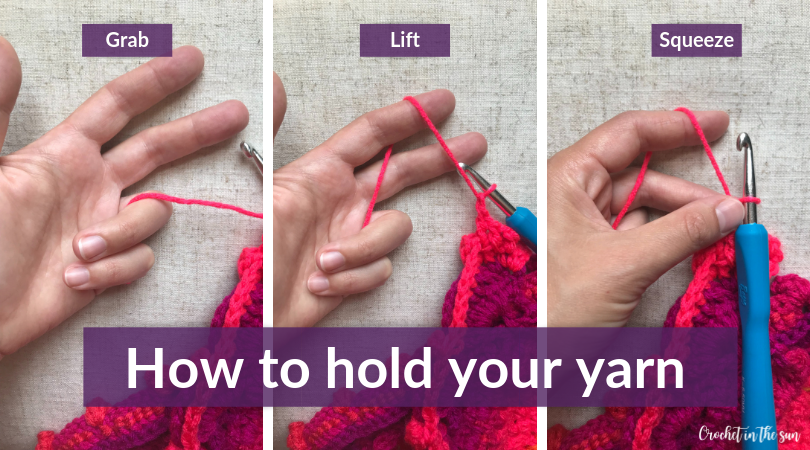
How to hold the yarn
As you start working your stitches, repeat “grab, lift, squeeze“. For the first couple days, I would literally say to myself over and over.
This is because you grab the yarn with your bottom 2 fingers, lift the yarn with your pointer, and squeeze the work with your middle finger and thumb.
Abbreviations (US Terms)
- Chain (ch)
- Single crochet (sc)
- Half double crochet (hdc)
- Double crochet (dc)
- Slip stitch (sl st)
- Yarn over (yo)
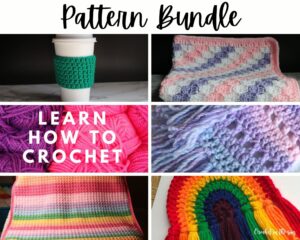
Looking for crochet patterns? Have a look at my Crochet Pattern Bundle on Etsy. It includes some of my best sellers along with other new patterns!
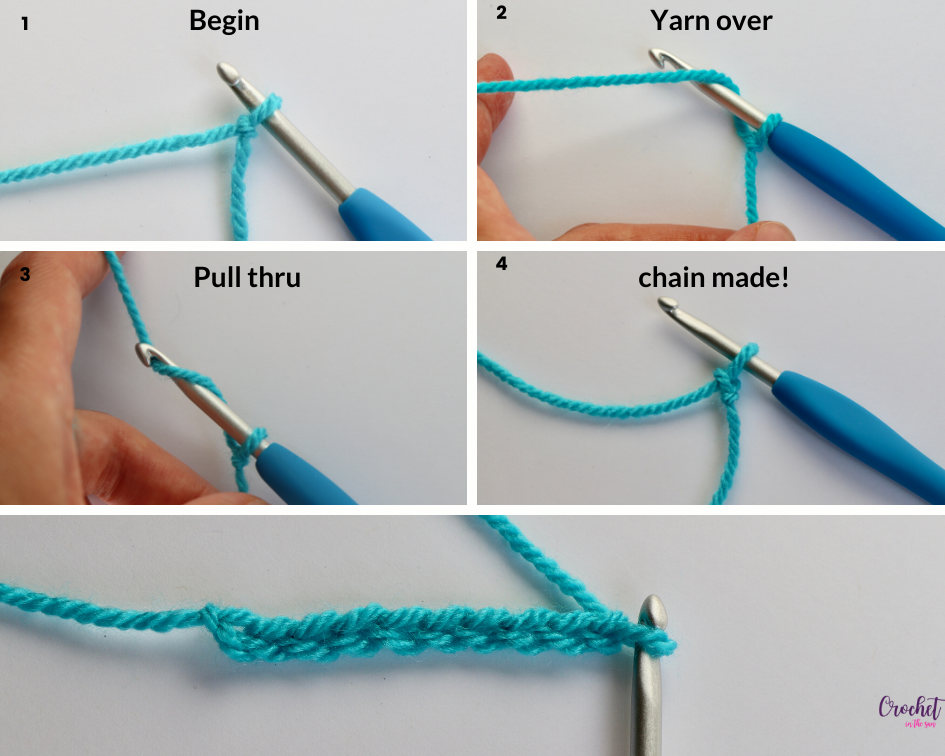
Chain (ch)
Most projects begin with a foundation chain.
Overview:
- Start with a slip knot. You will always begin with a slip knot unless otherwise directed.
- Yarn over. Bring the yarn over your hook from back to front, coming towards you
- Pull through.
- One chain made. Repeat steps 2 and 3 until you have made the desired number of chains
Working into the starting chain
Once you finish the chain, to start your first row you will work into the chain just created. Note what stich is used in Row 1, and that will determine in which loop you work your first stitch.
- Single crochet: skip 1 chain and sc into the 2nd chain from the hook
- Half double crochet: skip 2 chains and hdc into the 3rd chain from the hook
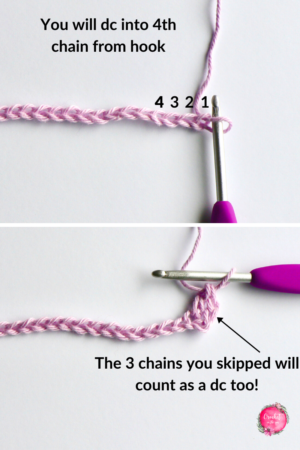
- Double crochet: skip 3 chains and dc into the 4th chain from the hook
The ‘skipped’ chains actually count as a stitch. That is why the number of chains you skip will depend on what sort of stitch you are working. Below is an example using the dc stitch.
Single Crochet (sc)
Although this is one of the most simple stitches, it is used in so many patterns, even the most intricate ones. You will be able to accomplish so much with this one stitch.
Overview:
- insert hook
- yo
- pull through 1 loop
- yo
- pull through 2 loops

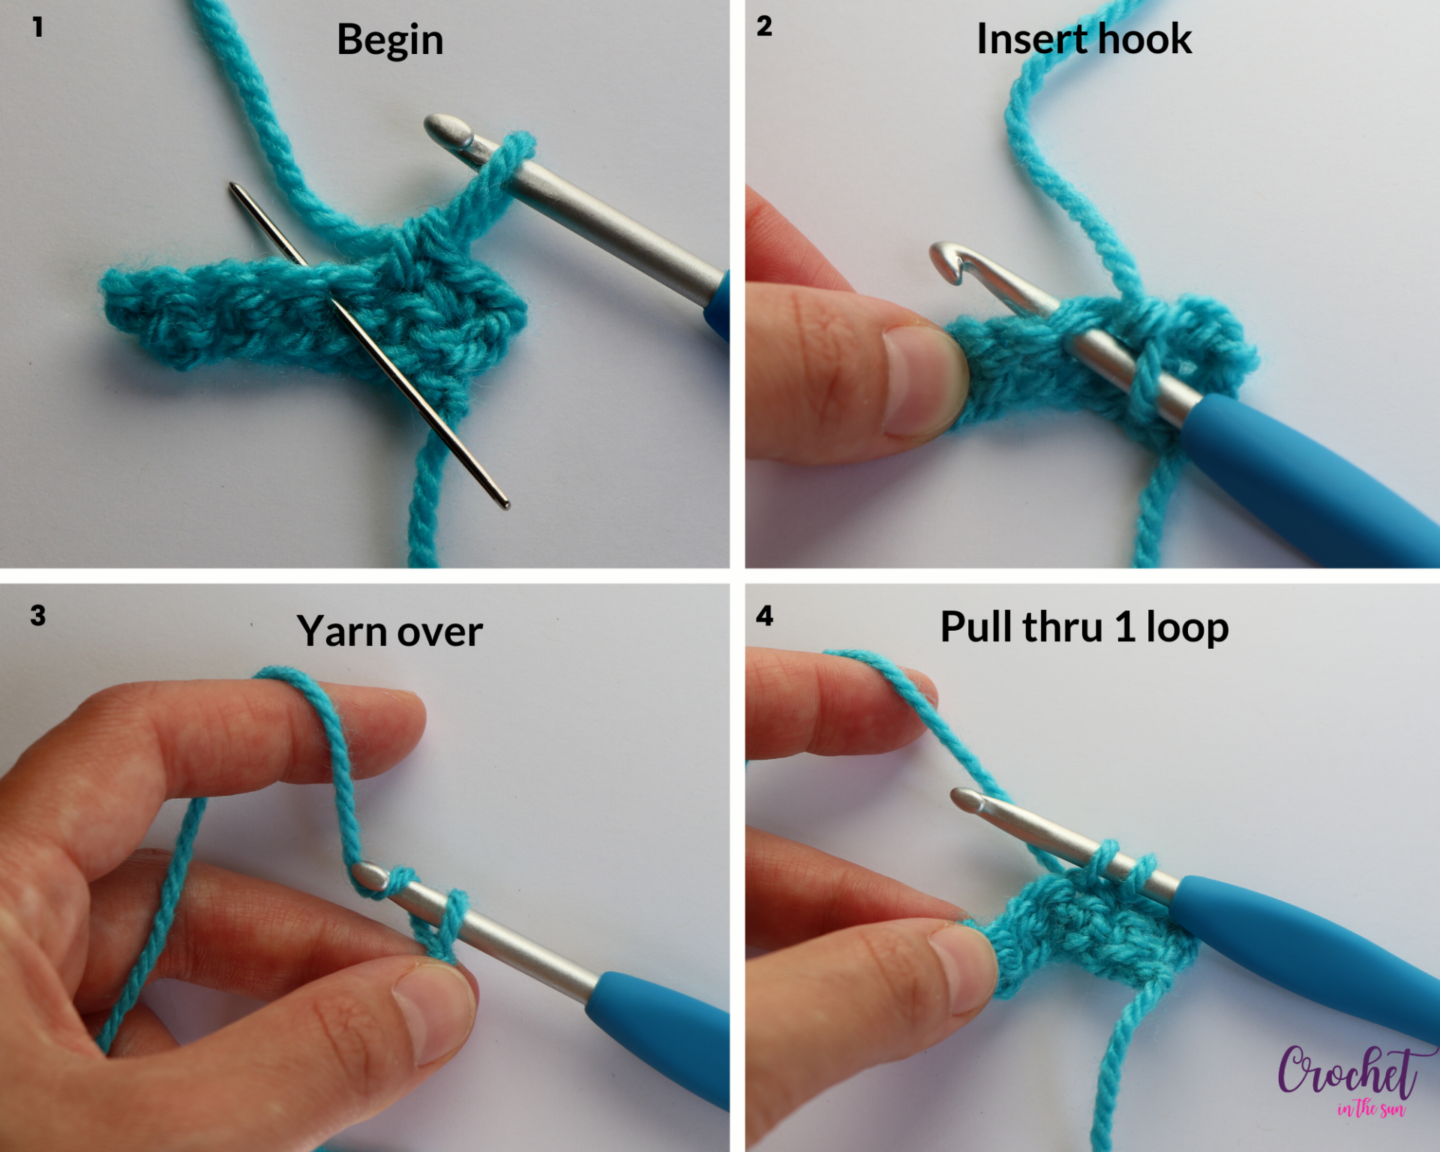
Photo tutorial with details:
- Before you start, identify where you will insert your hook.
- Insert your hook. Insert through the entire top of the stitch from the from the previous row. This means you insert through both the front loop and back loop of that stitch.
- Yarn over. Bring the yarn over your hook from back to front coming towards you.
- Pull through 1 loop. You should have 2 loops on your hook
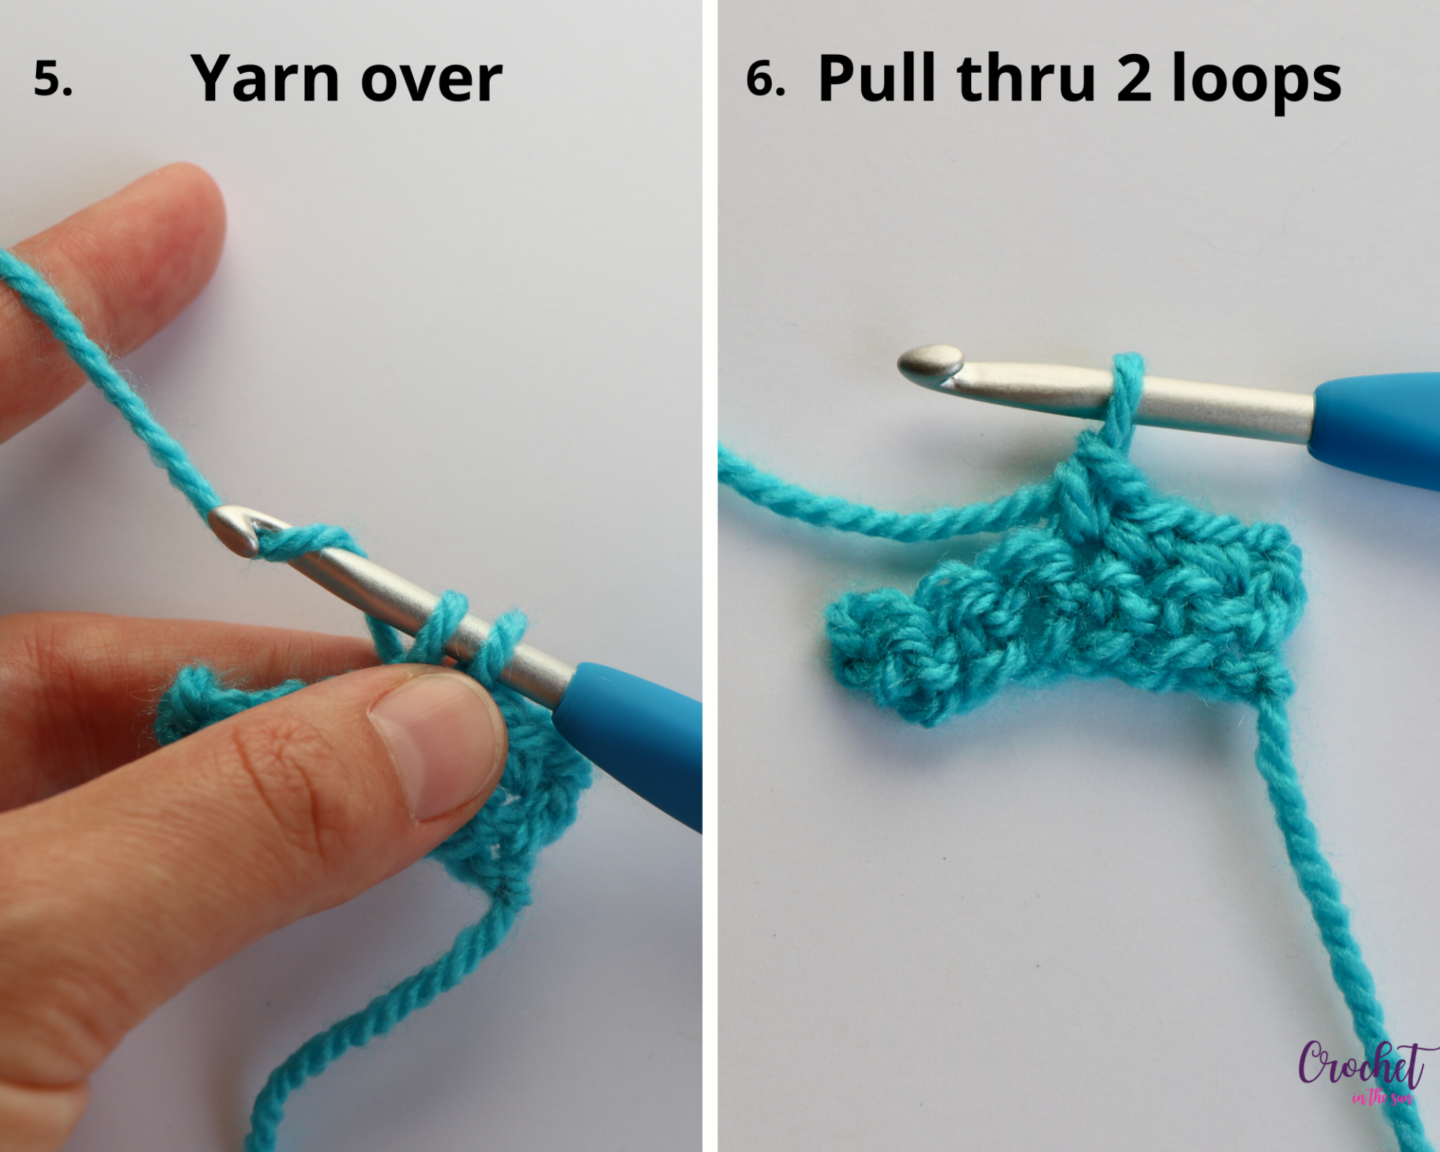
5. Yarn over. You don’t need to insert your hook – just yarn over as it is again.
6. Pull through 2 loops. Single crochet stitch complete!
Half double crochet (hdc)
Overview:
- yo
- insert hook
- yo
- pull through 1 loop
- yo
- pull through 3 loops
Photo tutorial with details:
- Before you begin, note where you’ll be placing your next stitch. You’re going to be working in the stitch that has the needle through it. This goes under both the front loop and back loop of the stitch in the previous row.
- Yarn over. Bring the yarn over your hook from back to front, coming towards you.
- Insert hook. Insert through the entire top of the stitch from the from the previous row. This means you insert through both the front loop and back loop of that stitch.
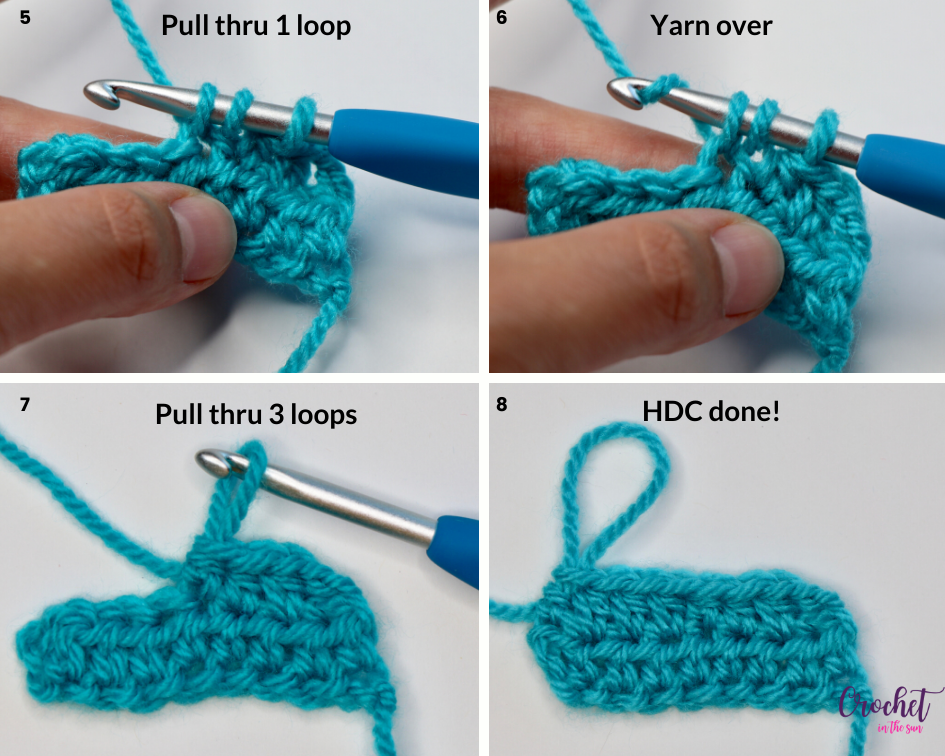
- Yarn over. You don’t need to insert your hook – just yarn over as it is.

- 5. Pull through 1 loop. You should have 3 loops on your hook
- 6. Yarn over. You don’t need to insert your hook – just yarn over as it is.
- 7. Pull through 3 loops.
- 8. Half double crochet stitch complete!
Double Crochet (dc)
Overview:
- yo
- insert hook
- yo
- pull through 1 loop
- yo
- pull through 2 loops
- yo
- pull through 2 loops
Photo tutorial with details:
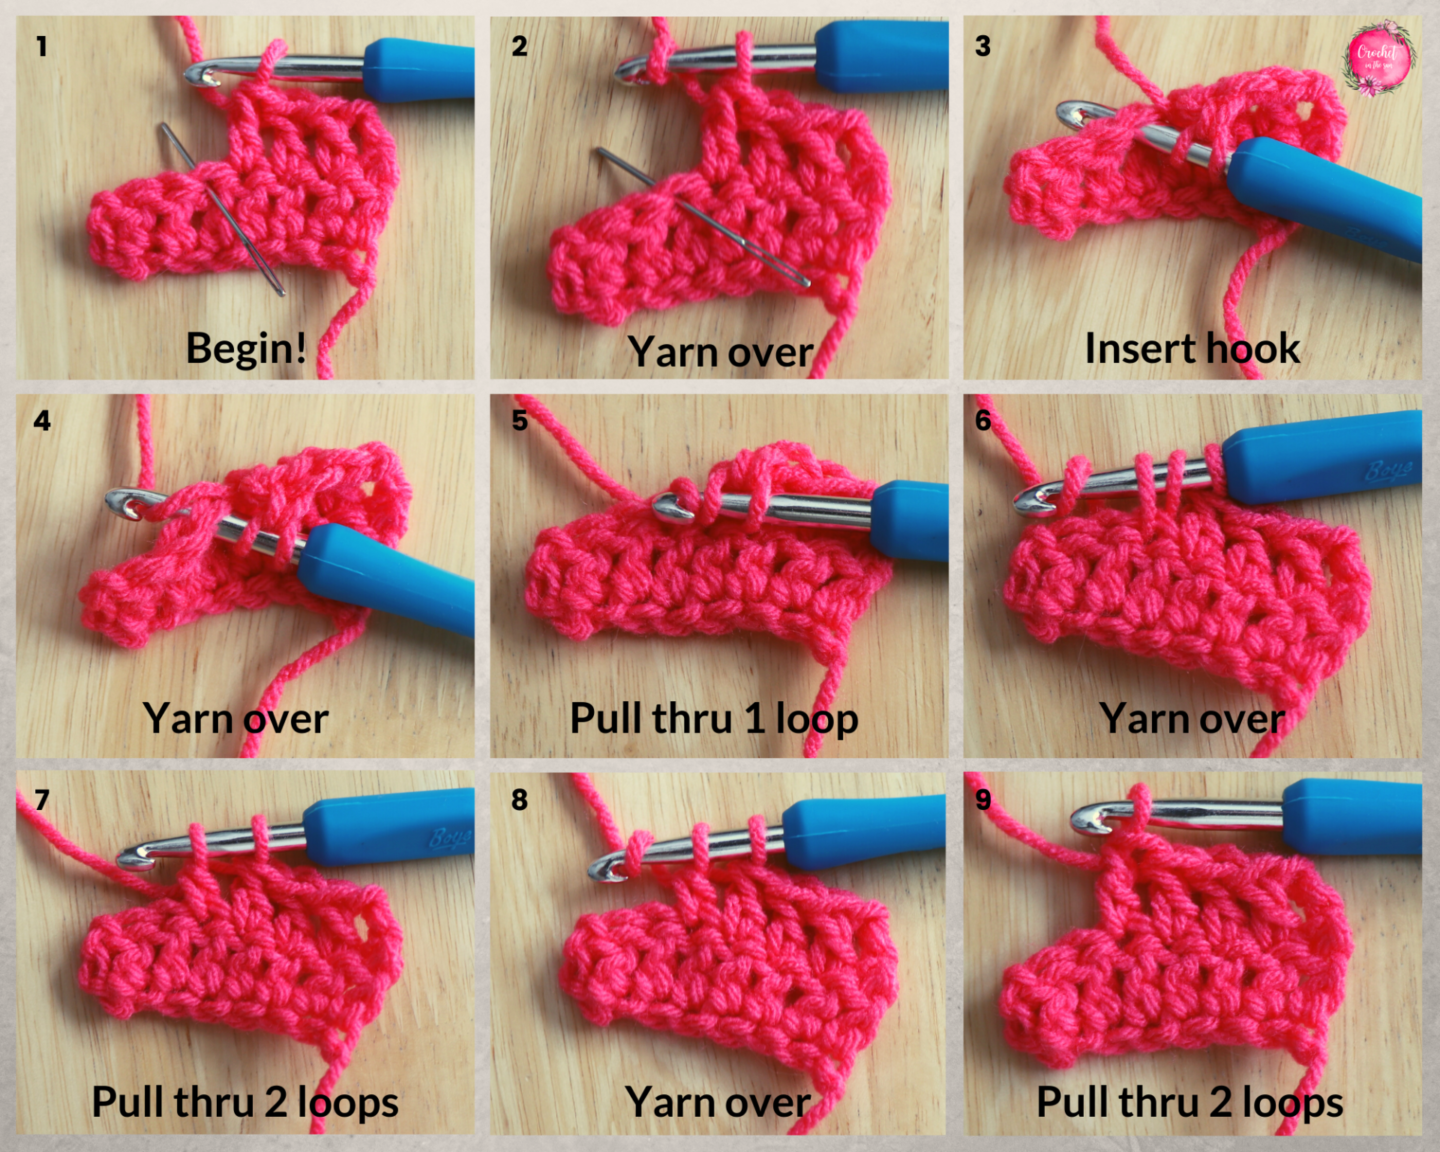
- Before you begin, note where you’ll be placing your next stitch. You’re going to be working in the stitch that has the needle through it. This goes under both the front loop and back loop of the dc in the previous row.
- Yarn over. Bring the yarn over your hook from back to front coming towards you.
- Insert hook through the stitch. Remember, this goes through the entire top stitch of the dc in the previous row.
- Yarn over again. You don’t need to insert your hook – just yarn over as it is.
- Pull through 1 loop. You should have 3 loops on your hook.
- Yarn over. You don’t need to insert your hook – just yarn over as it is again.
- Pull through 2 loops. You should now have 2 loops on your hook. (Almost there!)
- Yarn over. You don’t need to insert your hook – just yarn over as it is one last time.
- Pull through 2 loops. That’s it! You’re done!
You completed a double crochet stitch. How awesome are you!?
Chain up to start each row
When you begin each row, you must chain up a certain number of stitches to bring you to the correct height for the coming row. Below shows how many chains you should ‘chain up’ based on what stitch you’re working in the coming row.
- Single crochet: chain 1. This does not count as a stitch, meaning you will work your first sc into the first stitch from the previous row.
- Half double crochet: chain 2. This does count as a stitch, meaning you will work your first hdc into the next stitch below (you skip the first stitch)
- Double crochet: chain 3. This does count as a stitch, meaning you will work your first dc into the next stitch below (you skip the first stitch)
For the hdc and dc: Since you start the row with chain 2/chain 3 and that does count as a stitch, you will work a stitch into the top loop of that chain in the next row. Else, your stitch count would start to decrease!
Slip Stitch (sl st)
This can be used to join two pieces of work, move ‘across’ your work, or adding a light border to your work without adding any height to the stitch.
Overview:
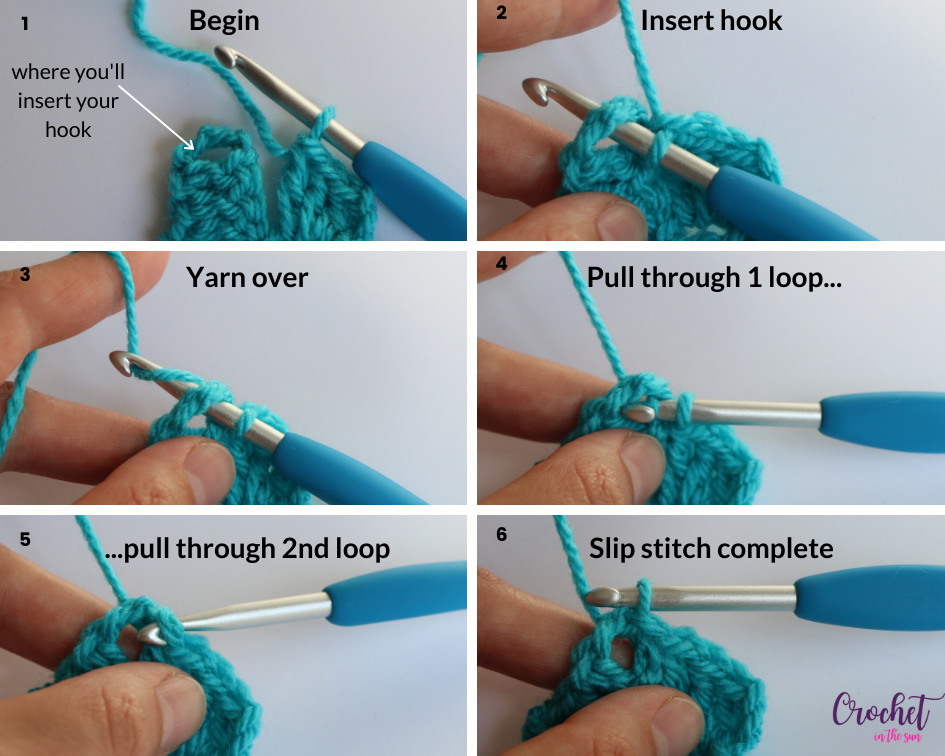
- Before you beg in, note where you’ll be working this stitch
- Insert hook. Insert through the stitch (or a chain space like you see here)
- Yarn over.
- Pull through 1 loop…
- …And continue to pull through the 2nd loop
- Slip stitch complete!
You don’t need to get super fancy with other stitches just yet. Focus on the basics and get confident in them.
2. Work a swatch
Once you have learned the above stitches, work a swatch as follows:
- To start: chain 21
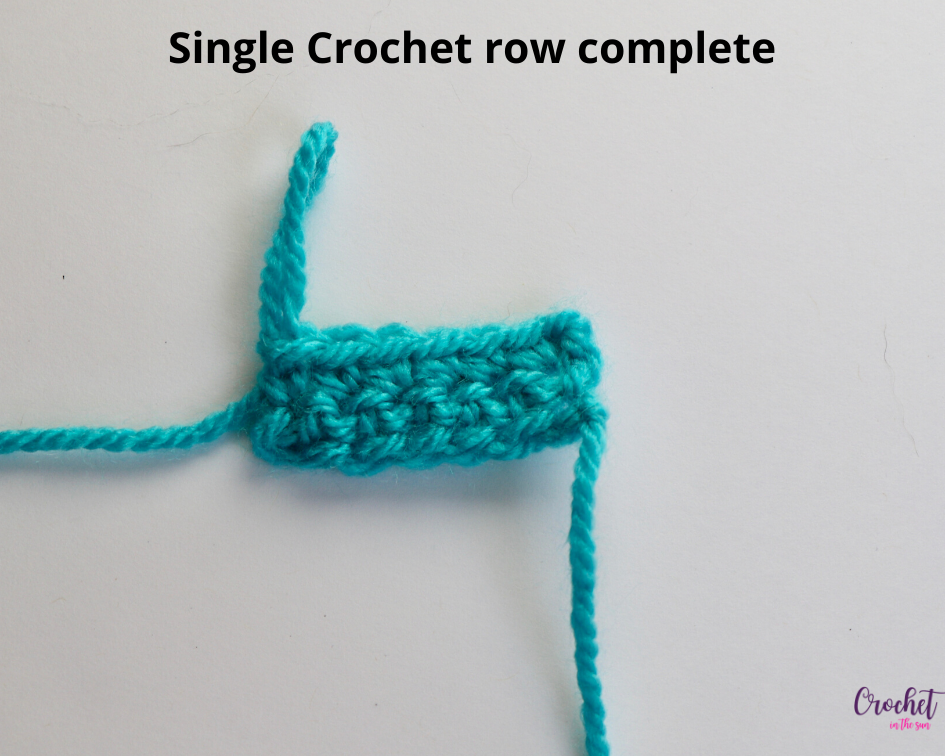
- Row 1: Single crochet (sc) row. To begin, place your first sc in the 2nd loop from your hook. Work a sc into each chain loop. You will have 20 sc. Turn your work.
- Note: To identify each stitch, look at your stitches from the top and you will see that each stitch has a ”v. That “v” is made up of the front loop and back loop of the stitch, where the front loop is closest to you and the back loop is furthest from you.
- Row 2: Half double crochet (hdc) row. Chain 2 and work your first hdc into the next stitch. (You don’t need to hdc into the 1st stitch, because the ch2 counts as your first stitch). Continue to work 1 hdc into each sc from the previous row. The stitch count for this row remains 20, which is made up of the [ch2] +19 hdc. Turn your work.
- Row 3: Double crochet row. Chain 3 and work your first dc into the next stitch. (Again, you don’t need to dc into the 1st stitch, because the ch3 counts as your first stitch). Continue to work 1 dc into each hdc from the previous row, working your last dc into the top of the ch2 from the previous row. The stitch count for this row remains 20, which is made up of the [ch3] +19 dc. Turn your work.
- Row 4: Single crochet row. Chain 1 and work your first sc into the first stitch. (You don’t skip a stitch because the ch1 does not count as your first stitch). Continue to work 1 sc into each dc from the previous row, working your last sc into the top of the ch3 from the previous row. The stitch count for this row remains 20, which is made up of the 20 sc. Swatch done!
Not only does this let you practice the most common stitches, it also allows you to get familiar with where to insert the hook in the previous row. Honestly, that was my first and probably most prominent point of confusion when learning how to crochet. Which leads to my next point…

Get familiar with the stitches and what they look like
After you work the swatch, take a minute to study the stitches. Sometimes it helps to stretch the yarn out a bit (after you’ve already worked the stitch, not before!), as it helps you identify the stitch a bit more clearly. Most importantly, identify where you insert(ed) the hook.
So you already know where to insert the hook?
Ok great! Now, this is where it might get tricky:
Understand that if your project has you turn your work, where you insert your hook will be flipped.
For example, you would insert your hook through the 2 top loops to the right of the dc ‘post’ when you’re looking at it the right way. (This is called the “right side”.) However, if your project asks you to turn your work, those 2 loops that you insert your hook into will be on the left side of the dc post. (This is when you are working into the “wrong side”.)
Please note: Not all projects have a Right Side and Wrong Side. For example, if you’re working on a blanket that starts in the middle and you chain up to start the next row and keep on working, you won’t ever turn your work. You will technically always be on the Right Side.

Crochet tips to keep in mind
Chain loosely for the starting chain
Chain a little looser for your starting chain (also called foundation chain) – or at least make sure the chain is not very tight. If your foundation chain is too tight, it will be difficult to see the loops and/or insert your hook in the loops, which makes for an unnecessarily frustrating start to your project.
If your tension is too tight, you can either: a) intentionally make these chains a little looser compared to how you would typically chain, or b) go up one or two hook sizes for the foundation chain then switch back to the intended hook size.
Use stitch markers – they can be useful if:
- Your pattern requires lots of counting: Saves you from re-counting and allows you to keep your place
- You’re working in a round: When working in the round, after you complete your first stitch, put a stitch marker into the stitch you just created before you move on. Usually, the first stitch of the next round will be worked into that stitch. Also, put a stitch marker into the last stitch of each round, so you don’t confuse the last stitch with the chain that starts each row.
- You’re working in a spiral: There is no obvious end to each round, since it doesn’t ‘step up’ in height with a chain. Stitch markers will make it crystal clear when you reach the end of one round and begin the next round
- You’re attaching 2 pieces together: Whether you’re attaching body parts in amigurumi, joining two granny squares, or something else, using stitch markers can really help.
- Seaming or sewing together: Keep two pieces of work aligned when attaching them using sttich markers. This way, you know the stitches will remain ‘matched up’ as you join them together. This can be a life-saver if you’re joining two long pieces together.
Don’t have stitch markers? No worries. You can use a bobby bin, a twist-tie off a loaf of bread, a safety pin, or loosely tie a different-colored piece of yarn around the stitch.
Crochet hook size conversion chart
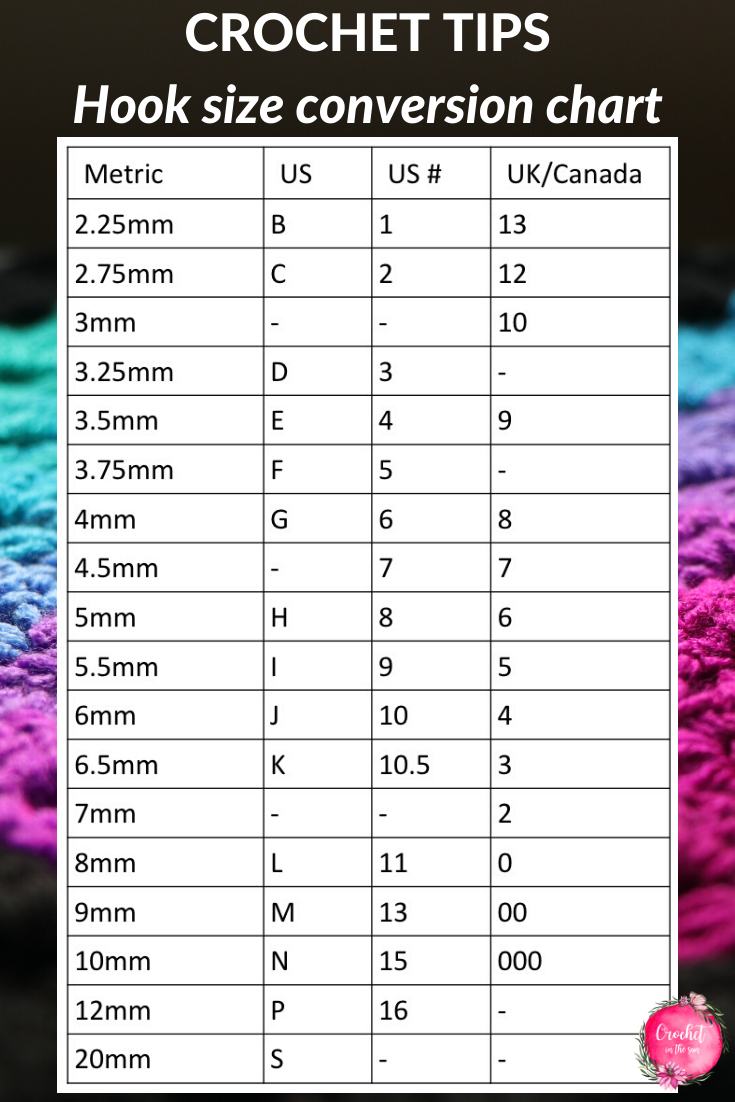
Since a different set of numbers and letters are used to classify crochet hooks across the world, the chart below easily brings it all together in 1 place.
Yarn weight conversion chart
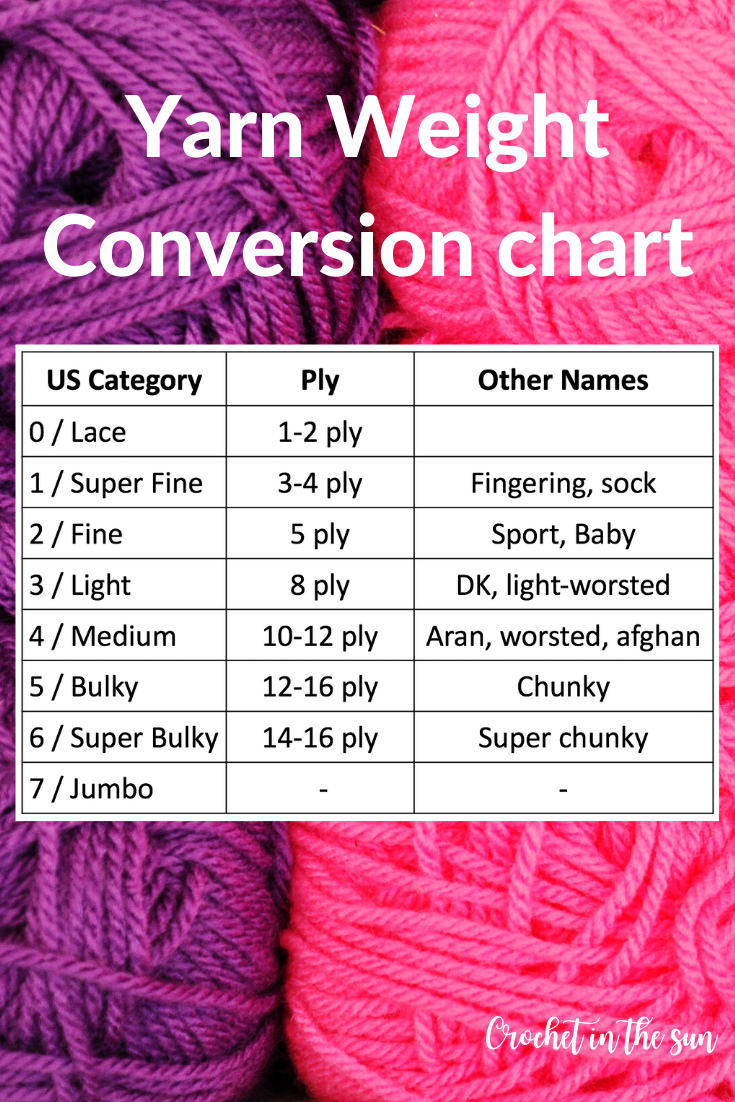
This chart links the US number and US category, ply (used in AUS and UK), and other terms commonly used.
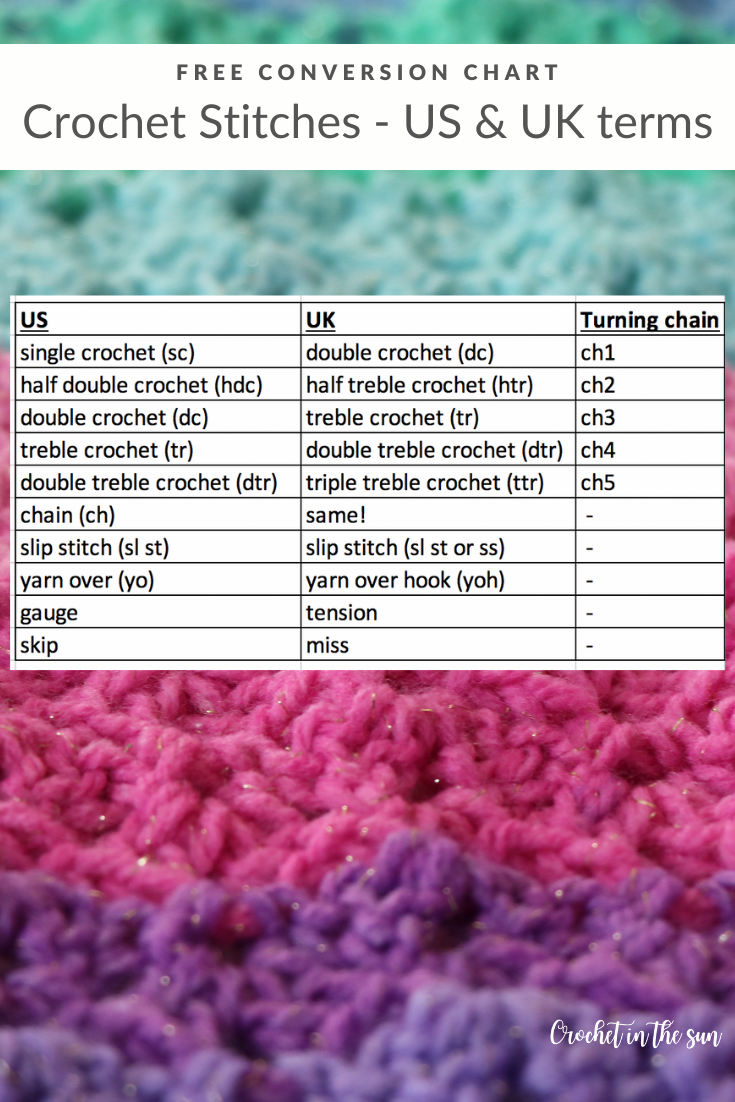
Crochet stitch conversion chart
Did you know that crochet stitches have different names throughout different parts of the world? Not sure why, but here we are! When I first learned to crochet, I would have to google ‘crochet stitch conversion chart’ whenever I was reading a crochet pattern from someone outside the US. So I thought it would be super useful to have all this information in 1 place,
Blanket Yarn
While blanket yarn is super comfy and fuzzy, it is very difficult to see your stitches. Therefore, it is not recommended to use this yarn when you are still getting familiar with your stitches.
Do this when you have to pause your work
When you need to step away from your project, use your hook to pull up your working yarn about 6+ inches (meaning, finish your stitch and pull the hook up so there is 6 inches of yarn slack).
Why? If your working yarn gets snagged or pulled, it can cause a bunch of your stitches to unravel! Rather, if you do this, that 6-inch slack will just get a bit shorter, which causes no harm at all.
So when you’re putting your ‘WIP’ in your bag or wherever you store it, make sure you do this to be safe.

Alternative tip: attach a locked stitch marker in the last stitch so it can’t come undone.
Don’t test with your fancy yarn
Don’t use your special or expensive yarn to test out a pattern. Some yarns look a little different once you’ve started working up a project, and have to frog it (i.e. pull it out and start over and ‘ribbit’ out!). The yarn can become a little fuzzy, so save the fancy yarn for when you’re ready for the real deal!
If you want to test a pattern before diving in, acrylic yarn is an ideal and inexpensive material to learn on. As for the yarn weight, medium or bulky yarn is great when you’re trying out new stitches. The bigger the yarn, the easier to see your stitches.
Be patient!
Let me take this time to remind you to be patient with yourself.
When my sister-in-law first taught me how to crochet, she looked over at me and asked, ‘having fun yet’? I gave a little laugh and said, “Nope, not yet!” My shoulders were so tense and I was getting frustrated about just not “getting it”.
However, after I (finally) completed my chain and single crocheted into that, I found it a lot easier to work my stitches. My tension eased up a bit and I began to gain confidence that I knew what I was doing. Just keep practicing and eventually it will click. Learning how to crochet isn’t something that you pick up after two minutes, so just keep at it.
Just keep practicing and eventually it will click. Learning how to crochet isn’t something that you pick up after two minutes, so just keep at it.
4. Find crochet inspiration
If you haven’t already done so, create a Pinterest board dedicated to just crochet. If you don’t have Pinterest account, I highly recommend it. Use it not only for crochet, but literally everything in your life, from dinner ideas to kids craft projects. Pinterest is 100% free – you never ever pay anything – and is basically a way to discover all the things you never know you always wanted to learn and try 🙂
Once you’ve created your Pinterest crochet board, you’ve reached the best part. Using the Pinterest search, search for ‘crochet project ideas’, ‘crochet projects for beginners’, etc and you’ll find thousands of free patterns, tutorials, and other great resources.

Do you see any that strike a chord or really inspire you? Save them to your Pinterest board. Over time you can create various Pinterest boards dedicated to crochet e.g. Crochet Tutorials, Crochet blankets, Crochet hats, pink crochet projects, etc. You will most likely refer back to these pins for months or years in the future!

#5. Decide on your first pattern
Alright, let’s start your very first project!
So where do you start? There’s two ways to approach it:
- Pick a yarn first and then find a pattern based on that yarn. Go for a browse in your local craft store and see what jumps out at you.
- Find a pattern first then search for a suitable yarn (e.g. a certain yarn weight or fiber content.) Browse through Pinterest or Ravelry for some crochet pattern ideas.
There is no right or wrong approach, you just need to follow your gut, and pay attention to what you tend to be pinning or gravitating toward on social media when you’re browsing crochet projects.
For me, I asked my sister-in-law if she had any recommendations for a first pattern. She picked the Cloudberry Blanket from Mijo Crochet, and then we went to Michaels to pick a color way of Caron Chunky Cakes. It was love at first sight – I fell in LOVE with the Ballet sorbet color! I was all ready to go!
Recommended beginner crochet patterns
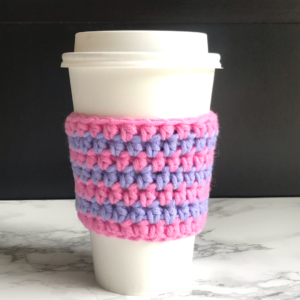
- Crochet cup cozy pattern
This is an easy 30 minute pattern, that will leave you with a cute and functional creation! The step by step photo tutorial makes it super easy to follow along.
This pattern is available for FREE on my blog, or pick up the inexpensive ad-free PDF printable from my Etsy Shop. Enjoy!
2. Double Crochet Blanket
The Sea Waves Double Crochet Blanket is a great first pattern, as you only need to know how to chain, slip stitch, and double crochet. This pattern doesn’t have any difficult borders or complicated stitch patterns to memorize, yet it truly is a beautiful blanket!!
Also, blankets don’t necessarily have to be a certain size – make this a ‘lapghan’ or baby blanket if you don’t want a large project to start.
Need to practice your pattern?
If you plan to use special or expensive yarn for your project, you might want to practice the first couple rows using scrap yarn, just to make sure you understand the basic pattern. This will let you work out any kinks. Once you feel confident, put the scrap yarn aside and start your project with your main yarn and get to work!
Tip: When you’re starting your first crochet pattern, try to work on just that. Having just 1 WIP (“work in progress”) allows you to focus fully on that and not get distracted.
After you’ve been crocheting for a while, you will likely have multiple projects in the works at any time! But to start, keep your focus clear and simple so you don’t overwhelm yourself.
Congratulations, you know how to crochet!
Thank you so much for following along, and I really hope this helped you get on your feet and learn how to crochet.
Thanks so much for following along! I really hope this helped you get on your feet and learn how to crochet.
Happy crocheting,
Jen
Crochet community
Here are some awesome crocheters. I encourage you to follow along with them. You’ll find that this crochet community is pretty darn awesome!
- Sewrella – she has beautiful garments! All of her patterns are free, or you can buy them ad-free on Etsy
- Bella Coco – you can find pretty pastel projects and many great tutorials!
- Repeat Crafter Me – Sarah has some adorable projects. Even though they may look tricky, most are beginner friendly. Her patterns are free too!
- Bhooked Crochet – I love listening to Brittany’s podcast on Crochet! She covers so many topics and often has some pretty cool guest-speakers. Numerous times I put on a podcast about a topic I never really thought about (like tapestry crochet), and by the end, I had like 3 ideas that I couldn’t wait to try!

Pin for later


This has been very helpful! Very simple and easy to follow.
Thanks Barbara! I’m happy to hear you enjoyed it ☺️
Regards,
Jennifer
Absolutely love all the information, advice and tips. I’m a newbie so am on a new journey.
Thank you!
Author
That’s great!! So happy this is helping you. Can’t wait to see what you create 🙂