
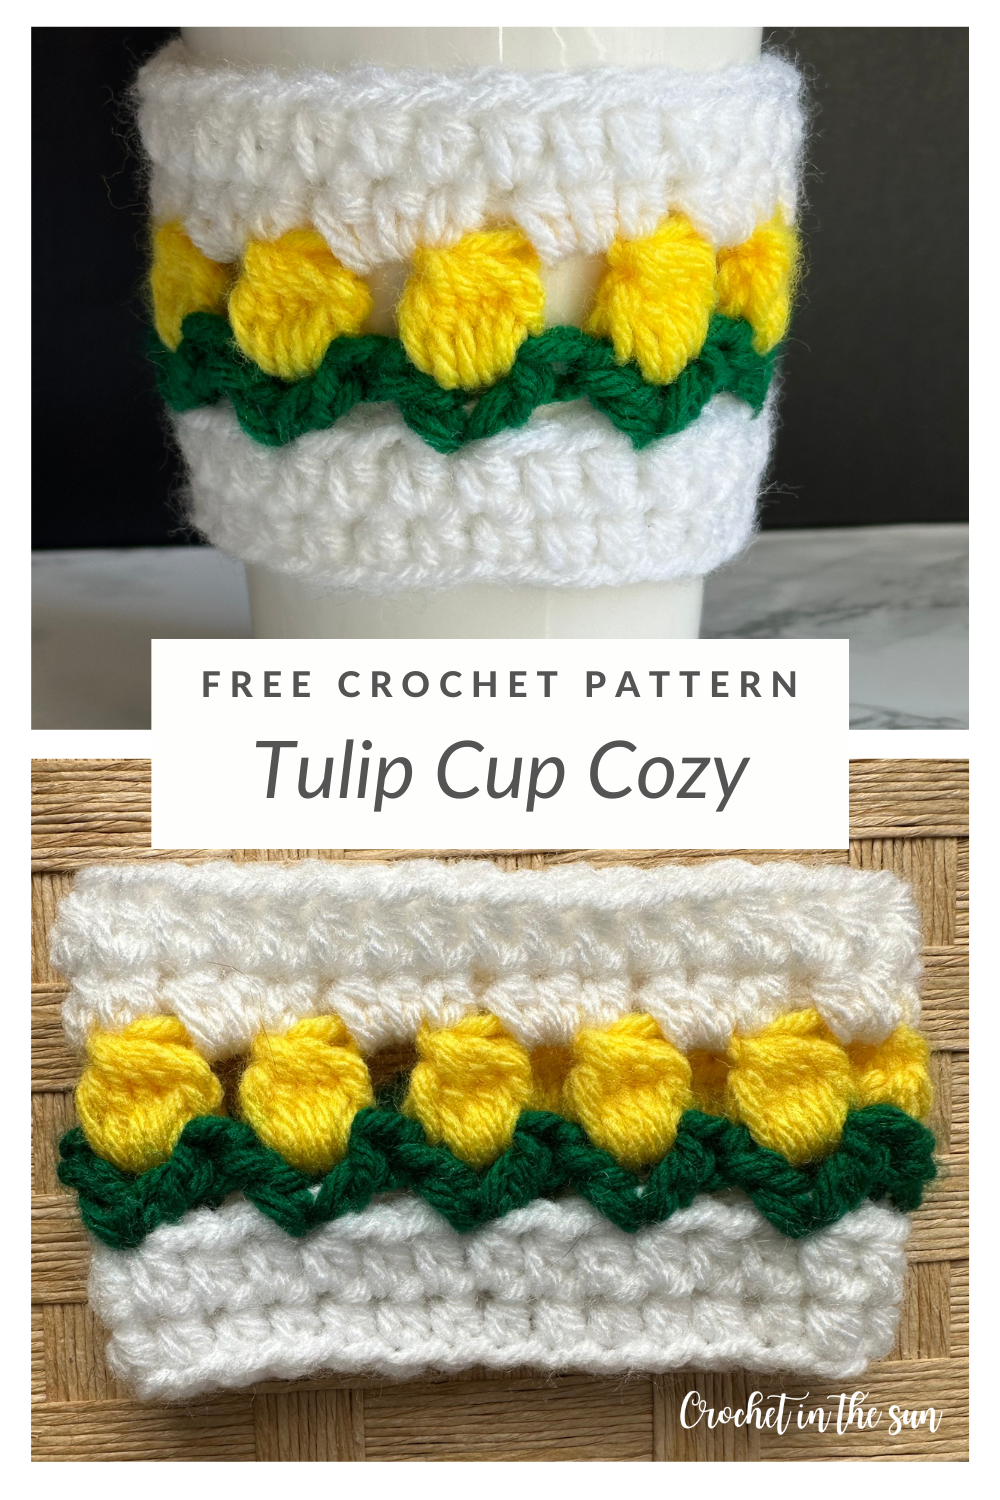
Spring is in full bloom, and what better way to celebrate than with a little crochet project that’s as pretty as it is practical! This tulip cup cozy crochet pattern is the perfect project for all crocheters – it’s colorful, fun, and you can have it finished in under 30 minutes. Whether you’re using the cup cozy for your morning coffee, an afternoon iced tea, or your favorite smoothie, this cozy will give your to-go cup a gorgeous spring upgrade. Grab your hook and let’s make something cute!
Skill Level
Easy
If you don’t know how to crochet, or just want to brush up on the basics, we have a great resource for you!
Hop over to the Ultimate Beginner’s Guide to Crochet. This breaks down the basics of what you need to learn, in what order, and link you directly to some great resources! And best of all, it’s free! Enjoy 🙂
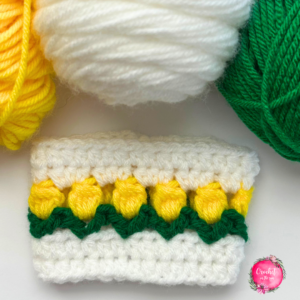
Materials & Yarn:
- 5mm hook (US H-8)
- Red Heart Super Saver in ‘White’
- Big Twist Value in ‘Varsity Yellow‘
- Paintbox Simply Chunky in ‘Grass Green’ – found on Amazon or Lovecrafts
- Yarn needle and scissors
Pick up your Paintbox yarn online at Lovecrafts!

Yarn notes and substitutions
- You can substitute different yarn as desired. For example, you may want to use a different shade of green for the stems, or use pink or purple yarn for the tulip blooms – the flowers look lovely in all colors!
- The green yarn I used called for 6mm hook (oops!), but I used 5mm hook for this project.
- Overall, any medium/worsted weight yarn should work here, but the size may vary slightly. So to be safe, measure the starting chain (ch29) – it should be ~9 inches. (The cozy will end up being ~4.5 inches wide after you slip stitch to turn the cozy into a tube). Adjust the starting chain as necessary so it measures 9 inches.
Stitches (US Terms)
- chain (ch)
- half double crochet (hdc)
- double crochet (dc)
- slip stitch (sl st)
If needed, refer to my Beginner’s Guide to crochet. Those stitch tutorials will walk you through how to complete the above stitches.
If you need to convert from US to UK terms, have a look at this chart.
Special stitches & Abbreviations
- V-stitch: In the same stitch, work a < dc, ch1, dc >
- ch1sp = chain1 space (the space that is created when you chained 1 in the previous row.)
- ch2sp = chain2 space (the space that is created when you chained 2 in the previous row.)
- Bobble stitch: In short, repeat the following sequence 5 times: < Yarn over, insert hook, yarn over, pull through 1 loop, yarn over, pull through 2 loops >, then yarn over and pull through all loops on your hook.
…In case that is confusing, here is the bobble stitch fully written out:
- Y/o
- Insert hook
- Y/o, pull through 1 loop
- Y/o, pull through 2 loops (2 loops on hook)
- Y/o
- Insert hook
- Y/o, pull through 1 loop
- Y/o, pull through 2 loops (3 loops on hook)
- Y/o
- Insert hook
- Y/o, pull through 1 loop
- Y/o, pull through 2 loops (4 loops on hook)
- Y/o
- Insert hook
- Y/o, pull through 1 loop
- Y/o, pull through 2 loops (5 loops on hook)
- Y/o
- Insert hook
- Y/o, pull through 1 loop
- Y/o, pull through 2 loops (6 loops on hook)
- Y/o, pull through all loops
Refer to the bobble stitch tutorial in case you get stuck.
Gauge
4 inches across = 4.5 tulips across / 14 hdc stitches across.
Not applicable for the height, as the cozy is less than 4 inches tall!
Finished measurement
The cozy will be 4.5 inches wide x 2.75 inches tall. This can vary slightly depending on the yarn used.
Your cozy will fit most standard to-go cups. This cup cozy works well for both hot drinks and cold drinks.
Pattern Notes
This pattern is worked in a tube, meaning after we complete the foundation chain, you sl st to attach to the 1st chain. I am pointing this out in case you were thinking we crocheted a flat piece, then sew it together. I tried that, but felt this tube method looks much cleaner with no seams!
The pattern starts as spiral for the chain & 2 rows of HDC. Meaning we will NOT join the rounds and NOT chain up to begin a new round. Rather, once we finish one round, we simply move to the next round by working a HDC in the first HDC of the previous round. But once you start the tulip rows, you will chain up for each row.
Tips
- Because the first 2 rows are worked in a spiral, put a stitch marker in the last HDC of the row. This makes it crystal clear which is the last stitch of the row.
- When working Row 1 into the chain, experiment with working the HDC’s into the back bump vs. the loops of the chain. To make it easier, lift each bump with your fingers a bit before you insert your hook. This makes it more obvious where the bump is, and easier to insert your hook. Why do this? I find that working into the back bump made the bottom of the cozy look tighter and more uniform. When I worked it into the chain loops, the bottom looked like it was stretched or a bit ‘gappy’, which wasn’t ideal.
- When weaving in the ends, since this project has a ‘wrong side’, I always slip my yarn needle through to the ‘wrong side’ and weave in the ends, to make it less noticeable.
- When changing colors, you can work the last ‘yarn over, pull through’ of the row in the new color yarn; OR, you can fasten off the old color completely then attach the new yarn color if that’s easier.
- You do not need to turn your work at any point.
Pattern overview:
To get a feel for how we will make this Tulip cup cozy, here is the overview:
- Starting chain: chain with white yarn
- Rows 1-2: HDC stitches in white yarn (working in a spiral)
- Row 3: Stems in green yarn
- Row 4: Tulip flower in yellow yarn/other flower color
- Rows 5-6: HDC stitches in white yarn (chaining up to start the row)
Pattern
- Get the inexpensive ad-free PDF printable from my Etsy Shop
- Pin this pattern to your Pinterest Boards
- Add this pattern to your Ravelry queue – coming soon!
- Buy directly below using Shopify – coming soon!
- Or – the pattern is free here, below! Scroll down and get started 🙂
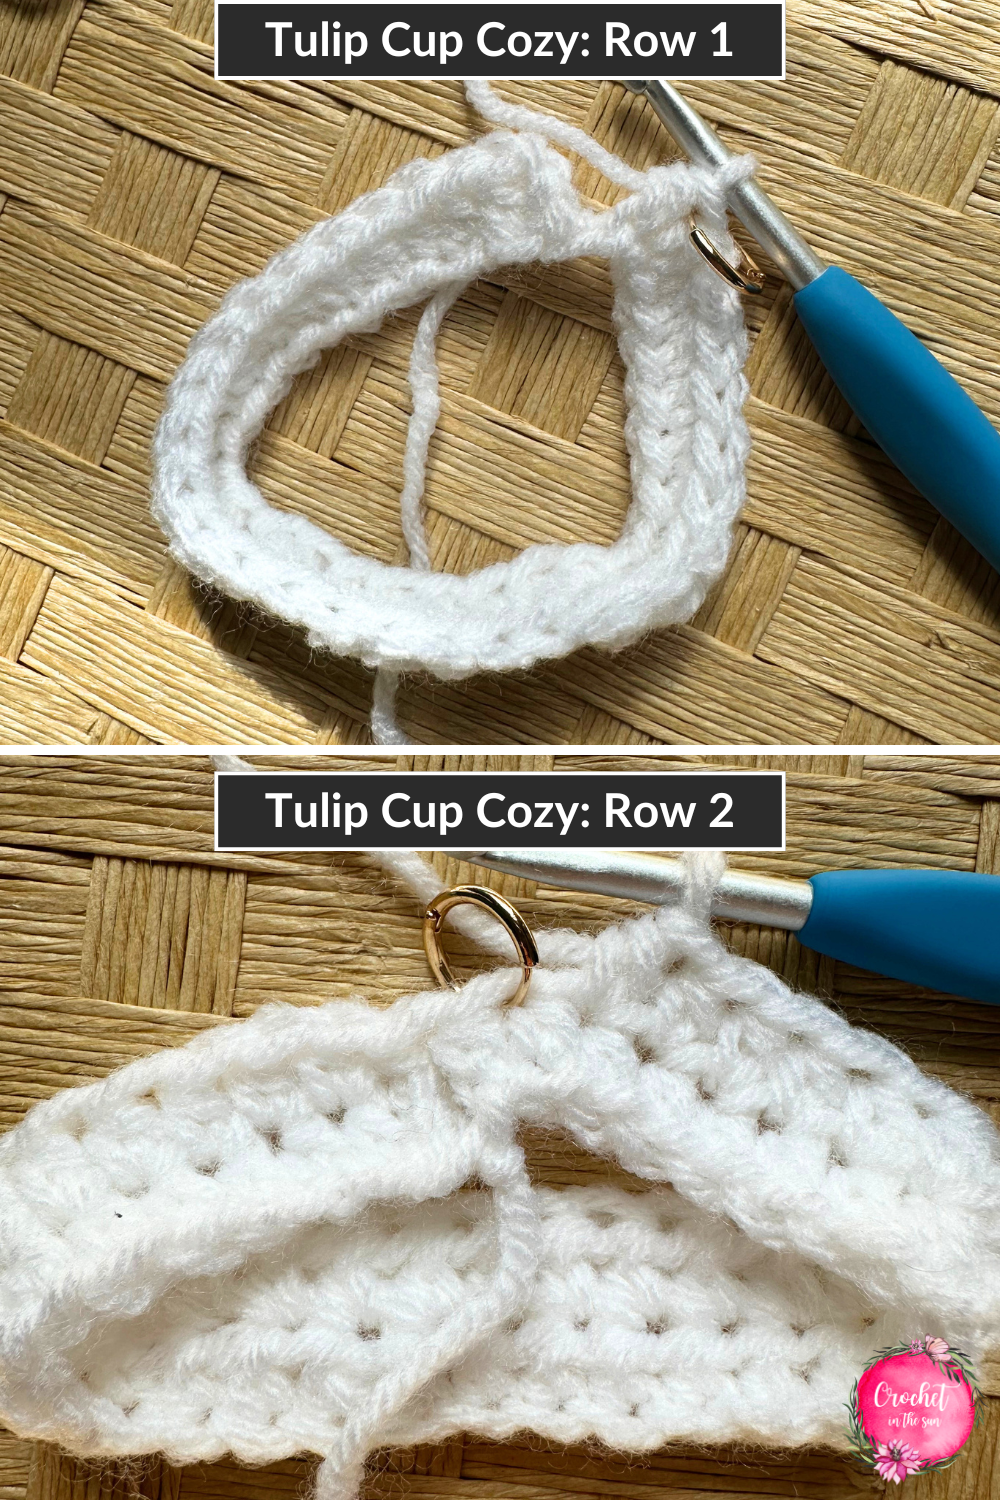
Begin with white yarn.
To start: Chain 29. Sl st to 1st ch to attach. Ch2, HDC in the same stitch as the chain 2. (Ch2 does not count as a HDC)
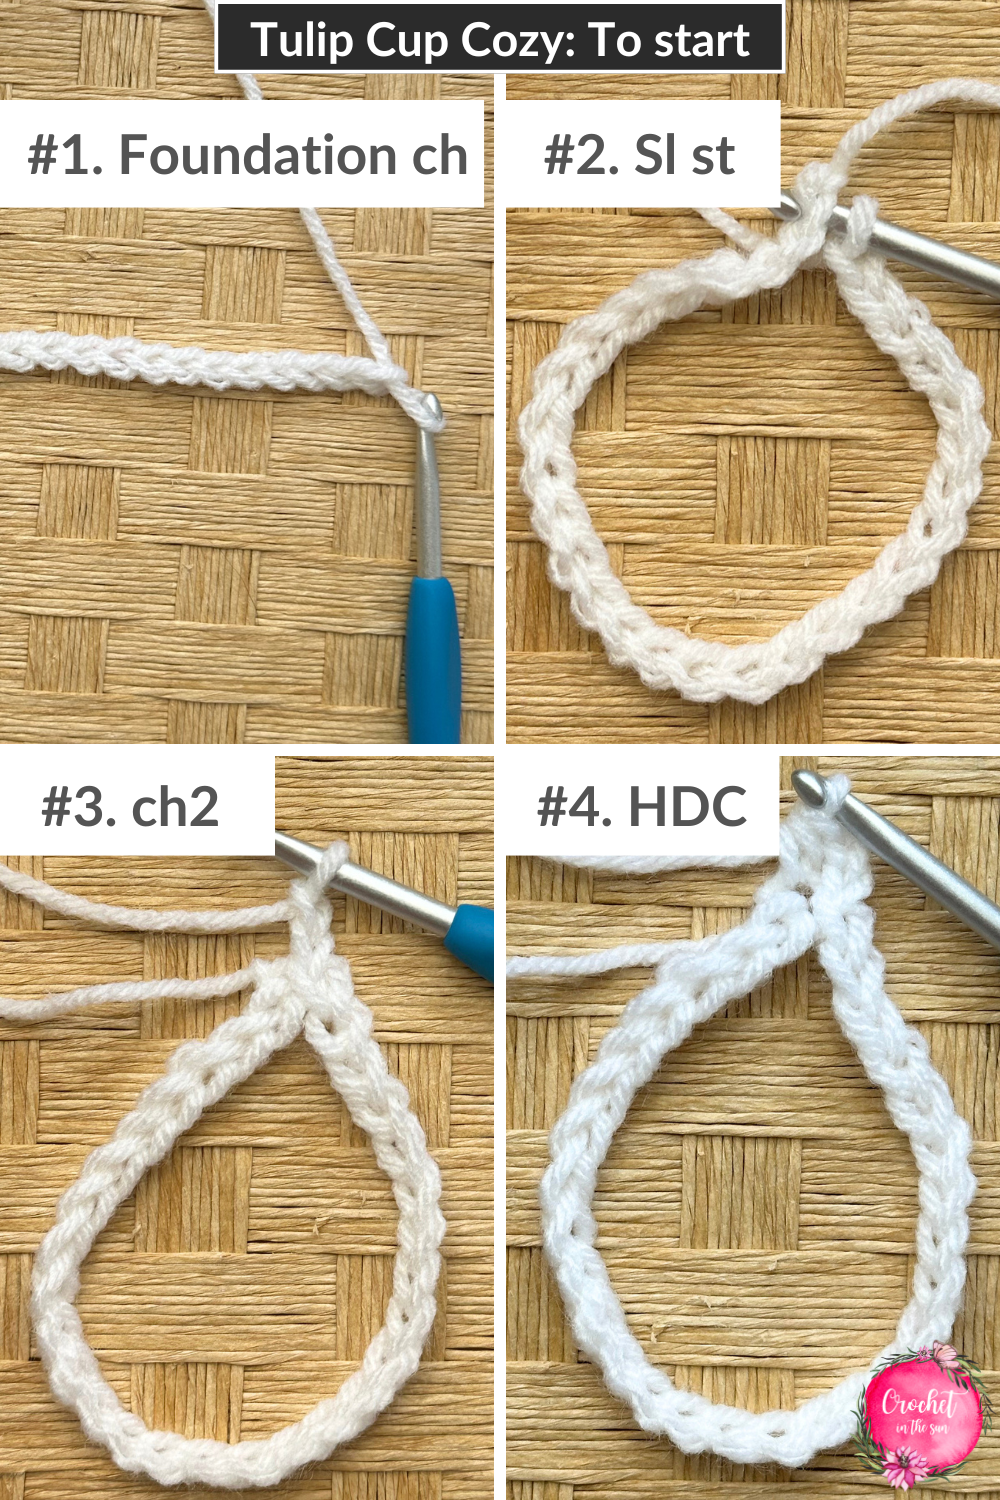
Row 1: HDC in each chain.
See Pattern notes about working into back bump of chain if possible. Psst, remember to place your stitch marker in the last HDC when you finish this row.
Row 2: Skipping the ch2 from the previous row, work a HDC into each HDC of the previous row. Remember, you don’t need to slip stitch start this row with a chain. Rather just work your 1st HDC into the 1st HDC of the previous row.
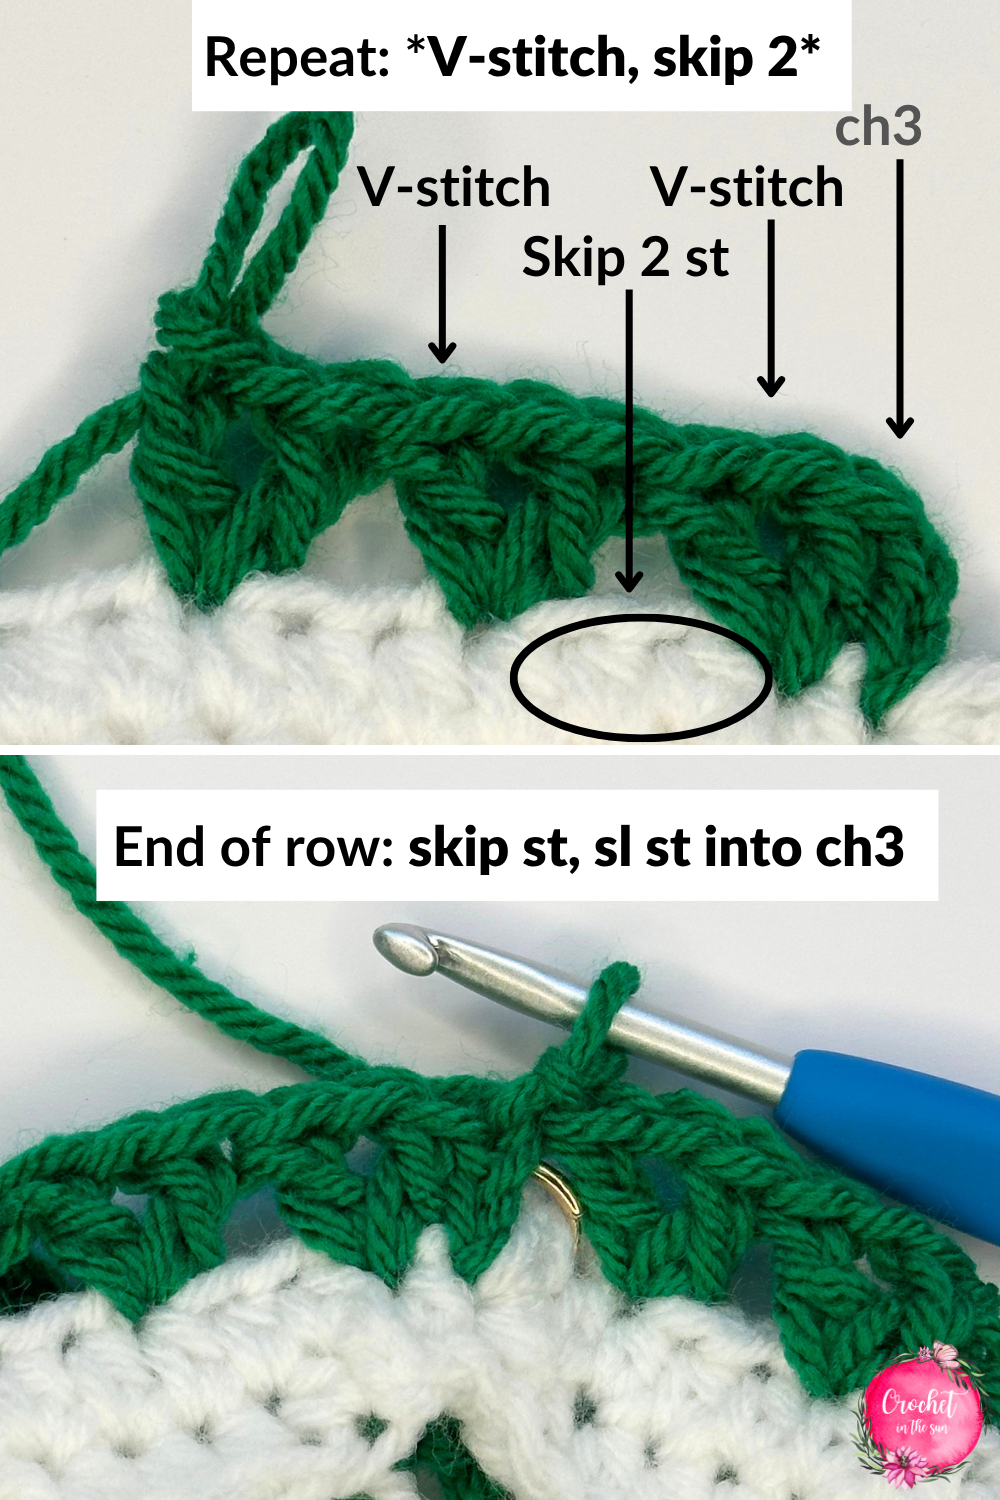
Switch to green yarn.
Row 3:
- Ch3, V-stitch into the next stitch. Skip 2 stitches.
- Repeat < V-stitch in next stitch, skip 2 stitches >.
- At the end of the row, skip a stitch and sl st into top of ch3.
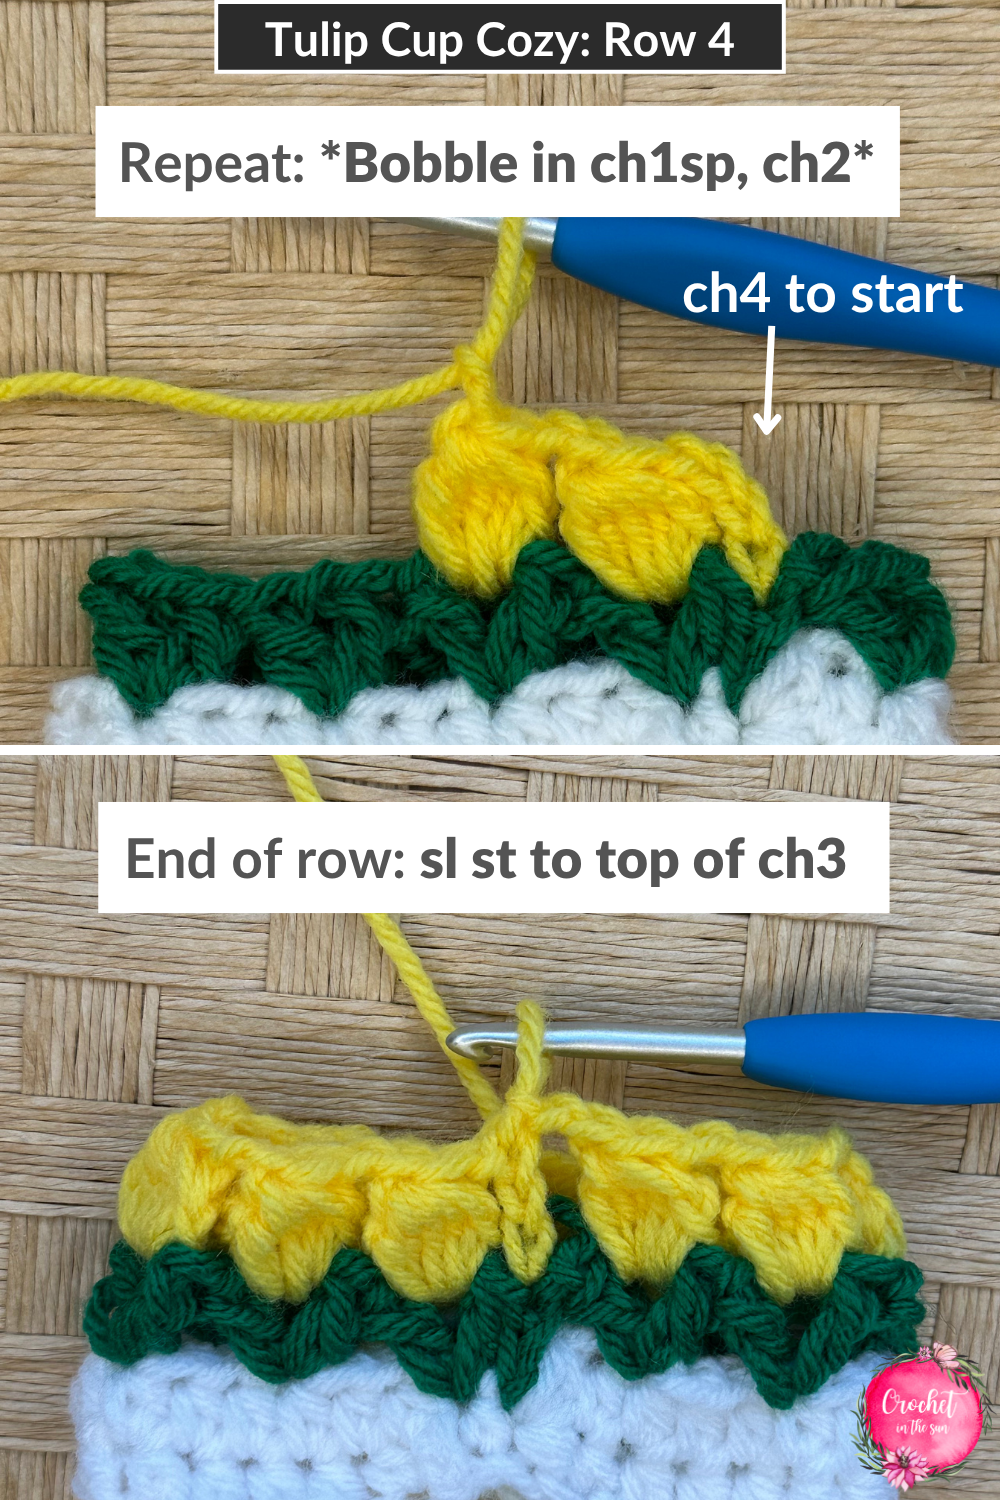
Switch to yellow yarn. I recommend attaching this yarn above the ch3 that you slip stitched to.
Row 4:
- Ch4 (that counts as a dc + ch1sp)
- Bobble into ch1sp. You are working into the middle of the V-stitch in the previous row. Ch2
- Repeat < Bobble in ch1sp, ch2 >.
- At the end of the row: after the bobble, ch2, then sl st into top of ch3.
Switch to white yarn.
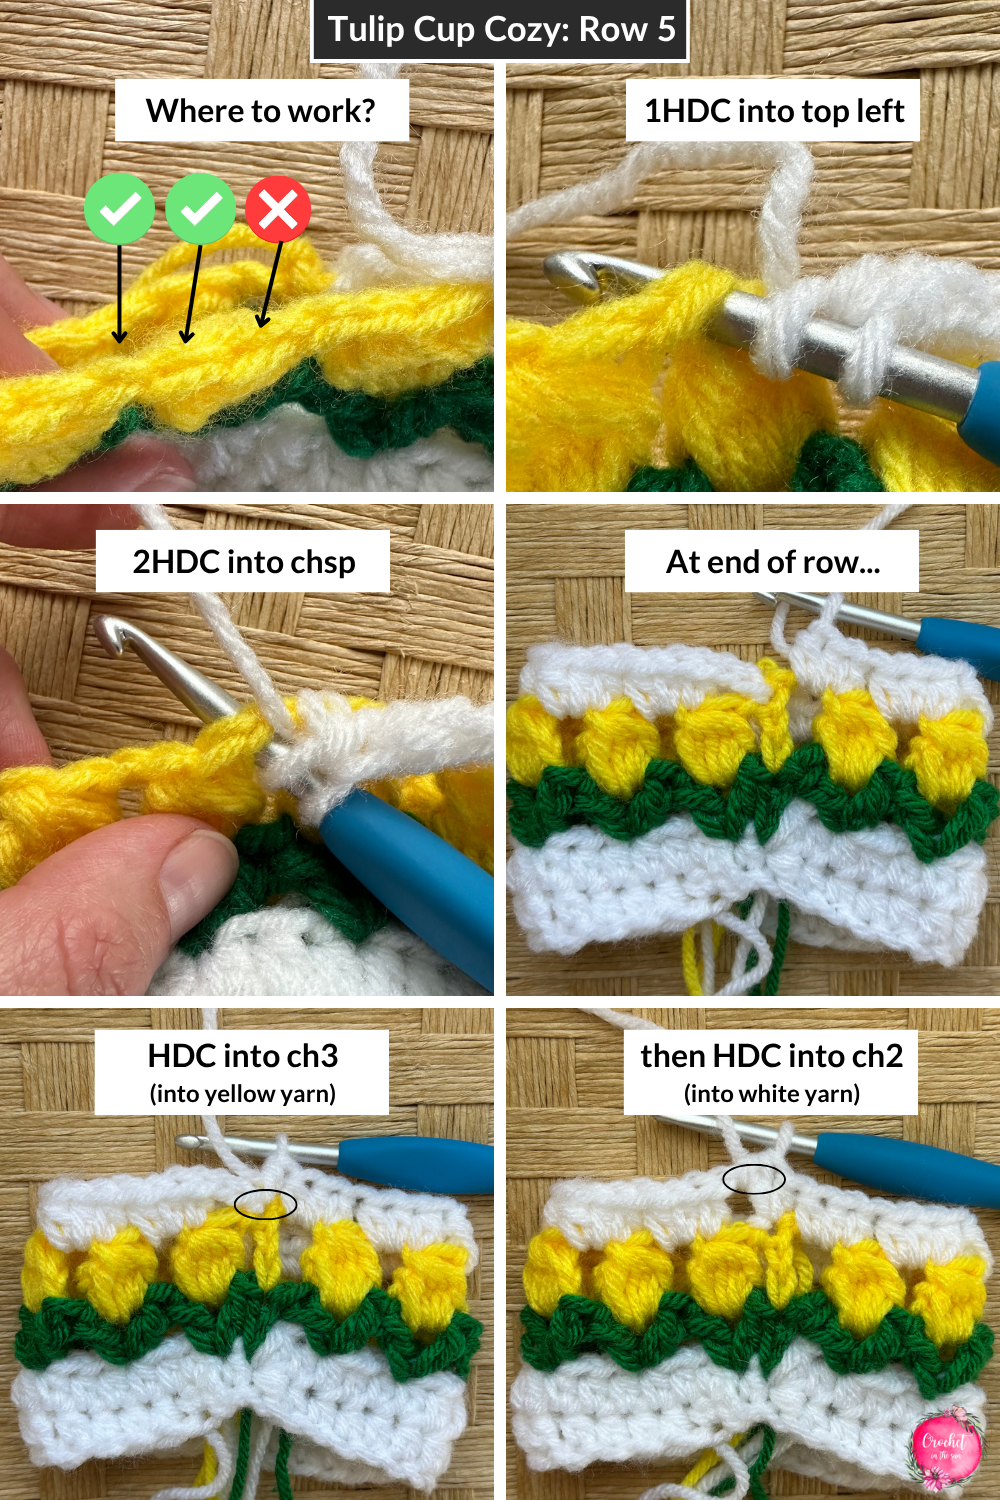
Row 5: Before we begin, take a look at the tulip stitch that you’re working into:
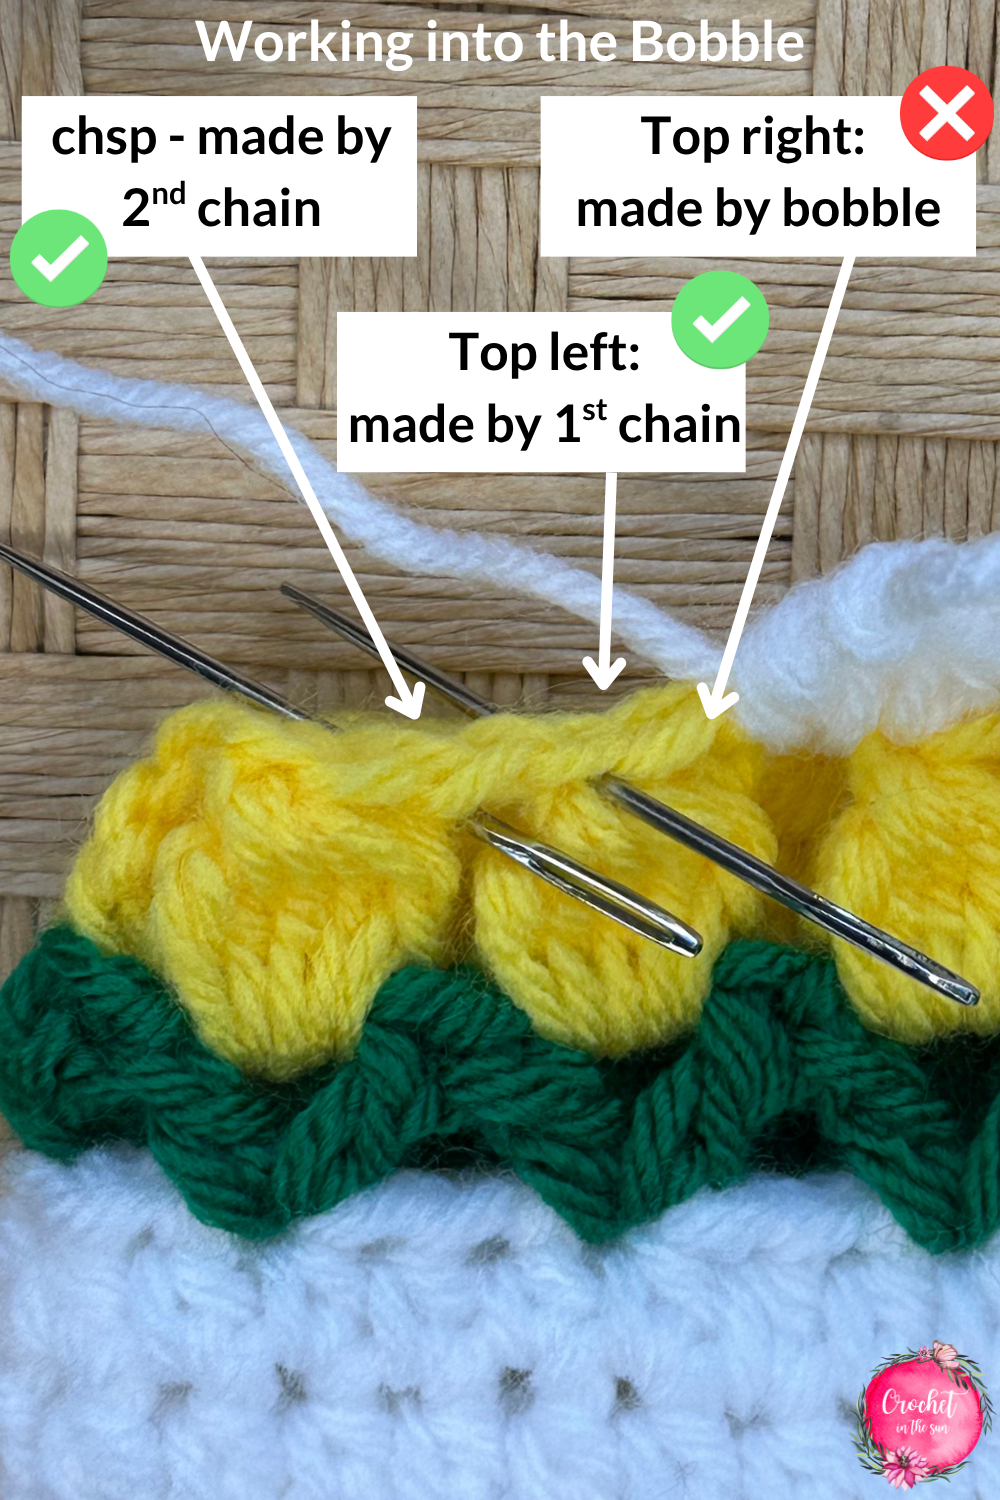
You have the top right of the flower (bigger opening, which was created by the bobble stitch), the top left opening of the flower (smaller opening, which is the first chain), then the chain space made from the second chain.
I’ve found that the best way to make the flower look most like a flower is to work into the second and third openings mentioned above. Believe it or not, where you work into the flower does make a difference as it ‘covers’ different parts of the yellow yarn.
- Ch2
- Repeat < 1HDC into top left of flower, 2HDC into chsp >
- At the end of the row, after you work the 2HDC into chsp as mentioned above, HDC into the ch3 from previous row (into the yellow yarn), then HDC into top loop of ch2 that started this row (into the white yarn).
That last step makes the row come together nicely. Plus, if that adds a stitch, that works well because cozies can be wider at the top, if anything (as cups are often wider at the top).
Row 6: ch2, HDC into chsp, then HDC in each HDC across. Sl st into starting ch2 and fasten off.
Lastly, clean up the bottom tail-end: You will notice that the bottom row will look a little uneven. That is to be expected. To fix this, weave in the bottom tail and pull towards the ‘end’ part of the first row. This will help align the rows so they appear even and in-line.
Thanks for following along! I hope you enjoy making these Tulip Cup cozies!!
I would love to see them. If you make one (or many) and share on social media, please link back to my blog and provide credit for the pattern. Also, tag me @crochetinthesun so we can see those cozies come to life!
Happy crocheting,
Jennifer
Pin for later

Useful crochet references
Have a browse through these resources to answer some questions you may have:


